A Great Piece For Transitioning From "Shop Furniture" To "House Furniture"
When making "shop furniture" there's a lot less pressure than with "house furniture". With "shop furniture", if something is less than perfect - well it's JUST shop furniture. Great way to get experience with design, tools, jioinery methods and techniques, different kinds of wood as well as finishes and finishing. If you make a mistake - it really does become an opportunity - to fix it or to come up with a way to do the task that gets around the source of the problem.
But at some point you eventually run out of excuses for not making a piece for - The House.
Now some throw caution to the wind and make the leap with a running start - a dining room table - with six matching chairs - and a sideboard - with dovetailed drawers. Then there's the crawl caustiously toward The Edge and peak over it, reconoitering, get maps and airial photos, hire an experienced guide, buy all the safety gear, including a snake bite kit, and prepare like it's an assault on Everest. The latter approach often leads to Paralysis By Analysis - so much into planning EVERY detail down to the Nth degree - and die before even beginning the project.
Me, well I'm somewhere in between. When the time is right to make a piece of House Furniture I figured I'd know it.
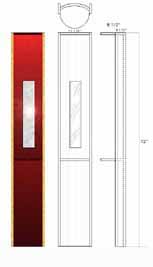
So when I saw John Dodd's "wall niche" on page 108 of "The Pendland Book of Woodworking" (ISBN-13: 978-1-57790-768-6 AND ISMN -10: 1-57990-768-7, $34.95 US) I knew what my first piece of house furniture would be. (http://www.penland.org/news/wood-auction/CATALOG/dodd.html).
And here's why this piece is perfect for a first House Furniture project:
- it doesn't look like any common piece of house furniture so there's no preconcieved notion of what it's suppose to look like
- it has a coopered center element which is interesting and I've already found that making curved things isn't as difficult as it seems
( see coopered doors for router bit cabinet for earlier coopering project )
- I have 200 bf of mainly quarter sawn "english sycamore" (which isn't actually sycamore at all, but a type of maple) that I
intend to use for House Furniture and this will be a nice low risk way to get familiar with how it works and how it finishes.
So here's the starting point - a quick and dirty scaled drawing and a little PhotoShop magic for a quick color rendering.
2, Working Out The Coopered Component
3. Joinery & Hanging Considertations
4. Prototype the Coopered Component (working out potential problems) - [page not done yet]
5. Forget Complicated Glue Up Jigs & Clamps - Use Masking Tape & Rubberbands - [page not done yet]
6. French Cleats - The Invisible Way To Hang Things (with some "wiggle room") - [page not done yet]
7. Loose Tenon Mortise & Tenon Joinery - Festool's DOMINO Makes It SO EASY - [page not done yet ]
8. Waxilit - THE Answer To The Glue Squeeze Out Problem
9. Selecting A Finish For Mahogany - Garnet Dewaxed Shellac - [page not done yet]
10. Selecting A Finish For Figured Maple - Popping The Grain - Oil, Dye or Both? - [page not done yet]
11.
<<<-------Back to the Site Index