The planer feed / pinch rollers are driven by TWO bicycle type chains. Apparently, under some circumstances, you can "throw a chain" and the rollers stop working. Seeing what does what is not easy to do. So here's what's insde that you can't see and access locations (in red n small line drawing).
Here's a simplified illustration and description of the planer's pinch rollers/feed rollers drive.

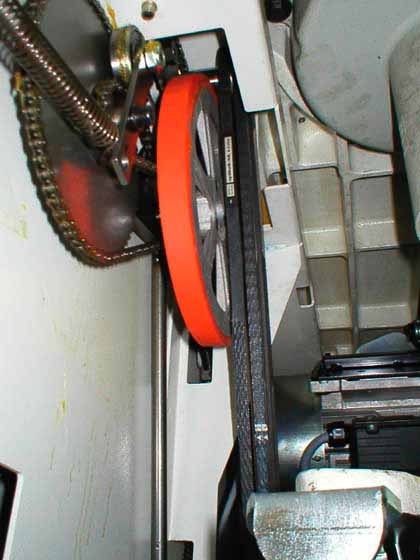
And if exploded view diagrams don't do much for you here's a photo of the inside of a MiniMax, which works the same way.
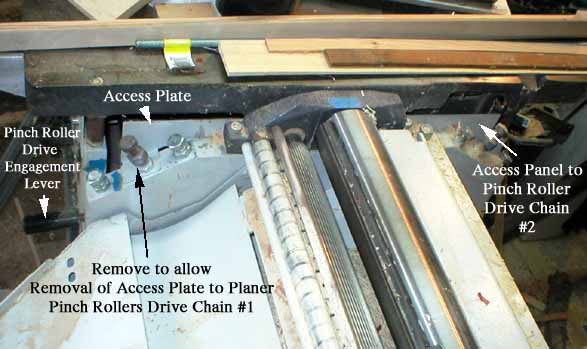
And here's how you get to those chains - without having to lay the X31 on its back. Much easier this way yes?
Here's Dave's (aka plittboy) method of replacing the "chain link" and "chain link clip" on Drive Chain #2
Thanks Dave and e-mail me the digital images you've got on the process.
OK, after some pain & anguish, I got my planer drive chain fixed. Here it is in all the gory detail - sorry in advance for such a long posting.\
Editor's Note: UNPLUG THE POWER CORD BEFORE STICKING ANY PART OF YOUR BODY ANYWHERE INSIDE THE X31 CABINET!
I was re-attaching the pinch roller Drive Chain #2, as identified in the exploded view charlie b provided. I started by opening all the panels and access doors, and making sure I had a fully clean floor under the saw, because I figured a lot of small parts would probably be dropping (turns out I'm a real sage!). I stuck a shop light through the access hole on the RH side, below the saw height adjustment. I pulled off 3 access plates, the two chain access plates shown in charlie b's second picture, and a small one above the planer feed engage lever (two bolts). Then I removed the saw blade, and rotated the saw mechanism away from vertical as far as it would go, to give me enough arm access and visibility (could have used some more, even with my skinny arms!) I also figured out it was a good idea to put the planer drive mechanism into the "STOP" position, to allow the pinch roller drive wheel/gear to freely turn.
My local bike shop had the chain master link parts I needed - a connecting link, a connecting flat cover piece, and a clip - charged me $1.00. I had the chain and the original connecting link, but never found the other 2 original small pieces - guess they're in the vacuum.
OK, here we go.
Standing at the back LH side of the saw (by the shaper) I lowered the chain through access hole #2 far enough down to drape the chain onto the large gear, and rotated the gear (clockwise, referenced to the front of the machine) enough so the end was about at 1 o'clock on the large gear. I had fashioned a piece of 12 ga copper electrical ground wire to have about 12 inches of reach, with a hard 90 degree bend sticking out about a half inch. Standing at the back RH side of the machine I fed the wire through the small access just below the table (above the feed engage mechanism), above the smaller drive gear and back toward access door #2, and hooked the end of the chain with the wire. This was actually pretty easy to do, since you can get your hand on the end of the wire and help it engage the chain end.
Anyway, once it was hooked, I simply pulled the chain enough to drape over the smaller drive sprocket, so that it hung down enough to be accessible below the bottom of the pinch roller drive wheel.
Now, standing at the LH side of the saw, I was able to put my right hand/arm through the saw table top opening and reach the hanging end of the chain, and pull it up tightly to engage on the bottom of the big gear, and slowly rotate (clockwise) the gear. Once I got the bottom end up to about 9 o'clock, I needed to put my left hand through access door #2, palm facing the back of the machine, and could get my fingers down to touch both ends of the chain, and hold them in place while continuing to rotate the gear until the chain break was about 11 o'clock, where gravity would keep things in place.
Whew, take a break! (of course, turns out that was the easy part)
OK, now to get the link and clip in place.
Getting the link in is fairly easy if it's inserted from the front side of the chain, but I couldn't see any way to get the clip mechanism on in that orientation. But I also couldn't come up with an easy way to get the link inserted from the back side of the chain.
How I did it was to utilize the second link that I had. Insert the link (from the front side of the chain) by reaching in through access door #2 - holding the link gingerly between my index and middle fingers of my right hand, I was able to get it inserted into the two chain ends pretty easily.
Then I rotated the chain back down so the unfastened link was accessible at the bottom of the chain run between the two gears.
Then I could lay on my back at the front of the machine and reach in with my left hand, now holding the second connecting link, and get behind the chain and push out link #1 with link #2, without having the chain come apart.
Kind of nerve wracking, but it worked.
Now to get the cover piece and clip on.
The cover piece was easy, the clip was the biggest chore, and required some resourcefulness. I found I could get the clip positioned in place, but every time I tried to get some pliers on it, it would fall off. I tried working at the bottom, and also trying to work through access door #2, all to no avail.
I decided to sleep on it.
The solution for me was a glue stick - the paste kind that kids use.
I smeared a small amount of glue stick on the clip, and pressed it onto the link left-handed, from the bottom front, lying on my back.
Then, standing at the front with my right arm through the saw table top opening holding a pair of needle nose pliers, I could just barely reach the clip. Maybe it was just luck, but I was able to get my arm far enough in there to get the tips of the pliers onto the clip without knocking it lose, squeezed, and SNAP that clip was in place. My forearm still has a red mark from being wedged into that opening, and I sure don't have big forearms (not enough spinach i guess!), so this might not work for a big guy.
There are certainly other ways to get this done, and there might be better tools to use, but this ended up working for me. I still have to put all the access doors and covers back on and re-adjust the jointer table height bolts, but I consider it a successful job.
Any questions or comments are welcome, maybe I haven't explained everything clearly. Also, I took some pictures that might be useful, but I'll have to learn about how to get them posted or make them accessible.
Now I have 56 boards waiting to be planed -
Dave
Editor's Note: I'll put your photos up with this stuff if you'll e-mail them to me, preferably with some text describing each picture.
Paul W (aka pauluscw) took a more direct approach which involved a bit more lifting and the possibility of the machine falling on you
From the New England guy:
My local hardware store (Rogers Ace) had the missing for my broken
chain.To access the inner working I tilted the machine about 45 degrees supported it properly and then fixed it.
I cannot remember whether I repaired the chain first and then installed it, or whether I put the chain in position and then repaired it.
Looking at the schematics I wonder if it is possible to repair it first and then put it on.
Good luck.
Paul W
(more to come)