Though I could turn a 6 or 8" ball for the Ovum on my JET mini, I had to cut a square hole for the battery pack and wiring, and I didn't have a blank handy. A bowling ball seemed like a solution. Figured I could pick up a used one at a Salvation Army store or a bowling alley. Found that assumption was wrong. The guy at the hobby shop I frequent suggested using a florist's styrofoam ball. Cheap, easy to cut the chamber for the battery pack in and easy to drill.
A couple of coats of white gesso and four or five coats of brush applied white pearlescent paint and the Ovum was looking pretty good. But it needed something else. What was missing was some heavy clear gel detailing - applied with a glue applicatior that looks like a hypodermic syringe and tip. Spatula the gel into the syringe and, like piping icing on a cake, and extrude "veins" onto the outside of the Ovum. Not technically correct - but they add interest - and shadows - to the surface - a little Artistic License.
Now it was time to do the fun part - the fitting and wiring.
Well I got the motor to fit in the "head" of the Sperm component, and the power take off to spin the "tail" more or less centered. Had a video "cable" that was thin enough and flexible enough to connect the battery pack to the switch and motor - unfortunately - it was coax - center multi-strand wire in a sheath, outer multi-strand around it. Kind of messy to solder but would work. It was time for What Connects To What. Stripped some Two Pairs phone cable to get the small color coded wires for the connections and started twisting wire connections together as shown below.
 555
555
Was simple enough - with all the parts laying on my workbench. Push the button, the Red power light went on and the motor ran. GREAT! That was easy.
Now all I had to do with create some space in the Ovum for the battery pack, the power switch and wire from the Sperm. Since the Ovum was stryofoam that part was easy. A rectangular "hole" up the middle for the battery pack and wires, a hole in from the side for the switch. Turned a wooden sleeve for the switch to slip into - and out of if necessary - glued it into the hole in the Ovum and it was Soldering Time.
BUT - when you've got SEVEN wires to play with, and can only see what two of them are attached to - the battery pack - it's amazing how many ways you have - to get things WRONG! The power light would work, but the motor wouldn't. The motor would work, but the power light wouldn't. Push the power button ON - and nothing lit up or turned!
Eventually I got it right - then realized that the foam Ovum was way too light. Solved that with some holes, some lead birdshot and some melted wax to plug the holes. Some more threading wires through holes, figuring out what connects to what, some more soldering, stuff everything inside the Ovum and it was Test Time.
OOOOOPS! The Sperm component wheels turned in the WRONG DIRECTION! @#$!^*#@!!!!!!!!!!!!!!! Disassemble, de-solder, swtich wires, solder, re-assemble, stuff everything inside.
Should work now right? WRONG!!!!!!!!
Small wires are somewhat delicate. In the process of stuffing everything back in the Ovum one wire broke - @#$!^*#@!!!!!!!!!!!!!!!
Fixed THAT problem - but now it APPEARED that the wheels were turning the wrong way. De-solder, flip some wires, resolder, re-assembled AGAIN and test. The wheels STILL are turning the wrong way. WHAT? Removed the wheels, then the axle and then the motor, de-soldered, reversed the wires and resoldered, put everything back together and - the wheels were STILL turning in the WRONG DIRECTION! This was defying logic. In fact it was a simple mistake - of assuming that what you THINK you're looking at and what you're ACTUALLY looking at were different. Here's how this mystery came about.
This is a problem you work alone. Another set of eyes would have seen immediately if the wheels were turning in the right direction - WHEN the piece was orientated on the wheels correctly.
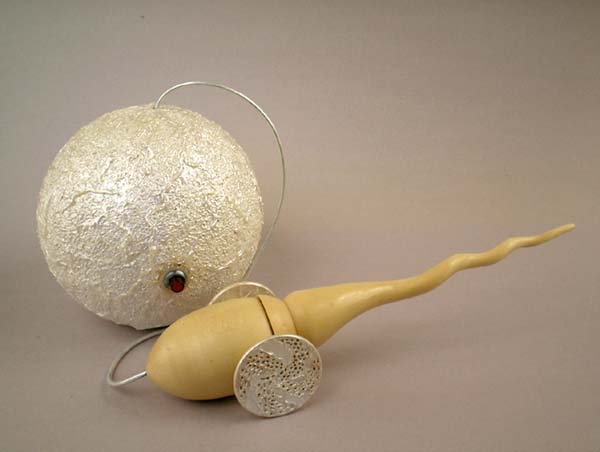
Eventually I saw what the "problem" was - a loose nut - me. So here's the still photo of the piece. Want to see this thing in action? click here for YouTube Video
Another Wild Hare Idea done. Now on to the next Wild Hare Idea - a tightrope walker Lidded Box, with Pendulum Finial and Outriggers - and maybe Internal Lighting and some Piercing.