Das MiniMonster (captured hollowing system)
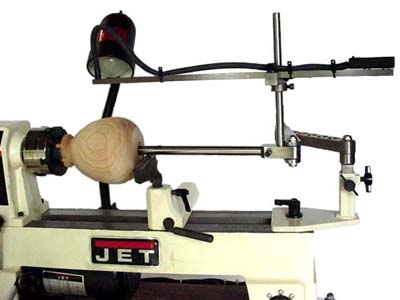
Here's the MiniMonster captured hollowing system I purchased in April of 2008, for $330 plus $30 for shipping. As you can see, relative to some of the other captured hollowing systems, it's relatively compact, and as you will see, comes with a pretty good set of diffrent cutters often "extra" (for extra cost) with other captured hollowing systems - AND a laser set up - that locks down solid.
Note: the lathe in this picture is not mine - too neat and clean.
Here's the complete package and you can see that there are quite a few parts you need to keep track of - and store when not needed.

(note: the round cutters in the above photo are now rectangular in cross section which solves several potentional ":challenges" - set screw dimpled round shanks not fitting in snug holes - AND - cutter edge angle automatically set at or close to where they should be to work effectively - but with some wiggle room so you can tweek things if you wish)
Why I chose the MiniMonster rather than one of the other "captured systems"
1. For $330 plus $30 S&H you get a pretty complete package that works together as a system. There's nothing YOU have to make.
Now ordinarily "package deals" often include stuff you don't want and probably will never use. That's not the case with the MiniMonster package - ALL the cutter attachemtns are what I'd want - and fit BOTH bars. No new car dealership "Base Unit Price" PLUS a mind numbing list of "options" and "special packages" which can increase the price of the Off The Lot Price by 40-60%. This thing comes COMPLETE - down to extra screws and all three allen wrenches
The laser, its battery pack and support system is designed as an integral part of the system, not an afterthought add on - that'll cost you "extra". The laser is pretty easy to set up and locks in rock steady - no vibrating "it's over here, no it's over there, no it's just a big blur".
2. The unit's base, which you attach to your lathe's ways, extends the support for the unit back off the end of the lathe's ways. That leaves you with more useable length for hollowing - a shortcoming other systems have - when used on a mini/midi lathe.
3. No special tool rest required. You can use the tool rest that came with your lathe, or any of the after market tool rests you've got.
4. Unlike some of the other captured system, you CAN adjust the height of the cutter quickly and easily. Handy if you want to set the cutter or scraper above, at, or below centerline or if you want to use it on different lathes. And that means you can , with some of the cutters, cut on the "far side" at the proper height.
5. The shank of the cutting attachments that fit in the hole on the bar all have a flat ground in the round shank or are square in cross section. . That's important because
Set screws are harder than the shank of the cutter heads - and therefore cut a "dimple" in the shank of the cutter when tightened down. If the shank's round and fits the hole in the bar nice and snug, that/those "dimples" can make getting the tool out - and later back in "fun". If you have to periodically sand or file off "dimples", after a while things can get a bit sloppy - and having to fight to get a cutter in or out of a bar is "not a good thing".
While a round shank does allow you to change the cutting angle - it also means that YOU- HAVE TO - set the angle, which can be a good thing, or a bad thing depending on how much you know about how each tool should be set up. With a flat on the shank you start pretty close and are left with a little "adjustment room". And since the flat is ground by the manufacturer, THEY get you real close to where the cutter SHOULD BE SET - handy since THEY designed the tool.Since you have a little adjustment room in the shank of the cutter, and a little adjusment room where the bar joins the articulating arm - you end up "in range" with enough adjustment available to tune how YOU want the cutter to work.
6. With the exception of the round carbide (?) cutter, the cutting tools are rectangular in cross section. THAT means that you can touch up a tool with a few passes of the top - flat surface - of the cutter over a diamond plate or stone - and restore the edge without messing with bevel angles or fingernail grinds - or grinding wheels. If it's easy to touch up and edge I will. If not - I probably will keep turning long after the edge is gone - really really really gone - which is a recipe for a mini-disaster.
This thing is as close to Plug & Play as it can get. As a Mac user I really appreciate that.
Minor gripes:
1. There are two "L handles" on the laser mounting bracket - which interfere with each other when they're first installed. Once installed they work just fine and lock the laser set up down - rock solid - yet make removal quick and easy.
2. There is no "users manual" and or assembly instructions that come with the unit. They are available online though. And as for a User's Manual - this thing tirns out to be pretty much Plug and Play - intuitive to put together and use - no studying the manual - nothing you have to make before you can use it. As a Mac user I REALLY appreciate how easy the MiniMonster is to start using.
3. The laser support bracket had nice square edges and corners which, when gripped - and that's where I grip this thing - can be a little hard on the palm of the hand. A minute with a small corrundum grinding bur took care of that minor problem.
4. The square cross section cutters are a bit long when installed in the "angled" attachment, limiting how small an opening you can hollow through to about an inch diameter. A little time with an angle grinder and a cut off wheel took care of that. But it's better to start with something too long and make it shorter since you can't go the other way.
5. This one's more a Loose Nut On The End Of The Tool (me) problem to mention - you can be pretty aggressive and somewhat fearless with this thing - and blow through the bottom or sides of a piece - IF you don't use the laser. Don't ask me how I know this ; )
6. It would be nice to have a 3'8" diameter "tip holder"for hollowing through a smaller hole.
NOW FOR WHAT YOU'VE BEEN WAITING FOR - HOW EASY AND HOW WELL DOES IT WORK?
Alas, I've only turned a couple of small hollow forms - 4" diameter, about 2 1/2" tall - in green California Pepper - not the best stuff to turn into a hollow form - so I've only side cut/undercut out from centerline about 1 3/4" inches. Had a few semi-good catches and the MiniMonster handled them without any drama. Having had an Inside Where I Can't See the Cutting/Scraping Edge Catch on many previous occassions - not a whole lot of fun when you're hollowing through a 3/4" hole and three or more inches inside - my confidence level with hollowing has gone up several notches. Hollowing had been a teeth clenching, white knuckle experience. Now it isn't.
Avoding the Owner Bias Thing When Evaluating Tools and Equiptment
I loaned my MiniMonster to a turning club member to try out - with the condition that he write up his evaluation of it. Since he has no vested interest in this thing his review will be less biased than mine - as the owner (If I bought it then it has to be PERFECT and the best thing out there - honest!). Click Here for his review of the MiniMonster
about all those parts - A Home For The MiniMonster ----->