Should I put a finish on my Pointy Stick and, if so, what is the best finish to use?
Ah, finishing. This is a critical decision and not one to be taken lightly, for it can make or break (figuratively speaking) the look, feel and function of your Pointy Stick. After all the time and effort that went into creating your Pointy Stick, the last thing you want is the blotchies, a finish that hides the beauty of the wood you so carefully selected for your Pointy Stick, or, God forbid, an inappropriate stain or dye.
So lets go over some possibilities.
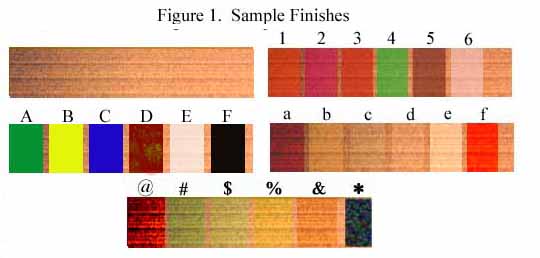
In Figure 1, below, the top image is the raw wood, the left side having been burnished. Note that even just burnishing the surface will darken it.
Finishes 1-6 are cherry stains 1=Marachino, 2=Bing, 3=Royal Anne, 4=Green, 5=Abrams, 6=Blossom Petal.
Finishes A - E are opaque pigments A=Limed, B=Lemoned, C=Blueberried, D=Fumed/Smelly, E=Whitewashed, F=India Ink "Ebonied"
Finishes a-f are shellacs, a=Garnet, b=Orange, c=Blonde, d=SuperBlonde, e=Dumb Blonde, f=Redhead
Finishes @ - & are "oil finishes, @=BLO, #=Teak Oil, $=Tung Oil, %=Danish Colonial Oil, &=Danish Natural Oil, *=Used 10W-30 Motor Oil.
Burnishing
Boiled Linseed Oil
Tung Oil
Teak Oil
Danish Oils
Shellac
French Polishing
Touch and Go
Pour It On and Rock the Piece
Spray a Lot of Thin Coats
A Few Hundred Words About Spraying Safety
If you're an extreme minimalist a good thorough rubbing with the smoothest stone you can find will yield a smooth, shiny burnished surface. This is the most time consuming of finishes and every ding, scratch and dimple will show. It provides the least protection from moisture and heat, is not very durable or scratch resistant and provides no UV protection at all. However, it is the easiest finish to maintain and the least likely to peal, crack or discolor over time.
Boiled Linseed Oil (BLO) is a very old wood finish and few know of its origin. You've, no doubt, heard the phrase "Let's boil him in oil! A fate worse than death!" Now that requires a lot of oil right? And what can you do with the left over oil? You can't just pour it in the nearest river or dump it on the ground - wouldn't be prudent and definitely not good for the environment. Some Boiling Oil Pot Stirrer must've notices that the wooden stirring stick or spoon,, when wiped down after use and put away for the next time, looked really nice the next time he/she went to use it. Turns out the "boilee" added something to the oil that made it produce a nicer looking finish - the first drying agent. Of course, little shiny spots of oil kept coming out of the grain for a while, requiring repeated wiping off. But EVENTUALLY the finish hardened and, with some extra hand rubbing with rabbit skin, produced a very attractive finish. BLO will "pop the grain" - but only on wood with a prominent grain.
Note that a BLO finish requires a very special procedure which is spelled out - in detail - below.
1. Apply a copious quantity of BLO to the surface
2. Let sit for half an hour.
3. Wipe off excess BLO.
4. Wait and hour
5. Wipe off BLO seeping out of the wood's pore. Rub vigorously.
6. Wait 2 hours
7. Wipe off BLO seeping out of the wood's pore. Rub vigorously.
8. Wait 4 hours
9. Wipe off BLO seeping out of the wood's pore. Rub vigorously.
10 Wait a day
11. Wipe off BLO seeping out of the wood's pore. Rub vigorously.
12. Wait a week
13. Wipe off BLO seeping out of the wood's pore. Rub vigorously.
14. Wait a month
15. Wipe off BLO seeping out of the wood's pore. Rub vigorously.
16. Wait 6 months
17. Wipe off BLO seeping out of the wood's pore. Rub vigorously.
18. Wait a year
19. Wipe off BLO seeping out of the wood's pore. Rub vigorously.
20. Repeat steps 1 - 19 until either
- the universe ends
OR
- you, your kids, your grand kids, great grand kids and great, great grankids are dead
21. THEN - rub the resulting surface lightly with 0000 steel wool to achieve a beautiful finish
TUNG OIL
(not tongue oil - sorry kids)
Tung Oil is extracted from the nuts of the Dung Tree (it doesn't sound so bad in Chinese). The Marketing Department was wise enough to change the name to Tung, figuring no one in their right mind would ever buy anything that was in any way associated with dung. It might sell in ancient Egypt, ancient Egyptians seemed to have really like the Dung Beetle - AKA Eqyptian Scarab. But in modern times TUNG os more marketable.
Anyway, a minute amount of tung oil is mixed with a HUGE quantity of mineral spirits (NOT mineral oil - that's something entirely different) and perhaps a little naptha ("greek fire") to make it dry quicker. Some manufacturers add some gelatin to thicken the mix up and make you think it's got a higher "real tung nut oil" content and therefore more expensive but better. Don't be fooled. LIke those cheap cigarettes that are "half horse manure and half sawdust" but there's really no sawdust in those cigarettes, this "thick real tung oil" doesn't have that much more tung oil AND it takes a lot longer to dry.
The schedule for doing a tongue oil finish is basically the same as for BLO, only the time involved is reduced by 3-5%.
Tung oil won't pop the grain quite like BLO and but it doesn't darken the wood as much as BLO. In fact it doesn't seem to do much at all after you keep wiping it off. The finish is a little more durable than BLO - but that isn't saying much. BUT it's easy to repair!
Contary to what they want you to think, Teak is resinous, not oily. Teak Oil has nohing to do with teak. I think it's actually a lima bean extact but I'm not certain. It will darken teak, and any other wood, a little and give it a slight greenish tinge. It will bring out the grain a little but won't "pop it". The finishing schedule is like BLO but the time span is reduced by 50%. The resulting finish, while easy to repair, does little or nothing to protect the wood from anything, other than animals that are allergic to lima beans.
During their long extreme winters, the Danes have little if anything to do - it's WAY to cold to go outside for any reason. As a result, they have a lot of time on their hands for 6 to 8 months of the year. Being a people with active minds, the Danes have come up with a whole host of interesting things (Victor Borga was a Dane though he moved to Southern California, ostensibly to pursue a career as an entertainer but really went there because it was WARM!), many of which are now on shelves as Danish Oil, Danish Walnut Oil, Danish Colonial Oil, Danish Natural Oil etc. I suspect that all of these "Danish" finishing products contain fish oil, mixed with a large quantitiy of, and even more odorous, mineral spirits.
Unlike the other "oil" finishes, Danish Oil is not flooded on the wood surface, but rather slopped on with either a handful of unwahsed, natural lamb's wool or Irish linen lace. After an appropriate amount of time has passed for the oil to "penetrate" the surface of the wood, the excess must be thoroughly wiped off with unbleached pure Egyptian Cotton handkerchiefs (no monograms - that will ruin the effectiveness of the cloth).
The resulting Danish Oil finish won't look that good but the wood will likely change colors enough to look different from the original wood. The finish is neither durable nor water resistant.
Shellac is a popular finish for most wood projects and is one of the few "natural" surface finishes that is auhorized by the Food and Drug Administration (FDA) to be eaten. Coated pills, M&Ms and apples in your grocery store all probably have a coat of shellac on their surface. This is a bit surprising because shellac is made from either the spit or feces of the Laq / Lac bug. Kids love to use shellac "'causeit's BUG SPIT!". It's fun to grind up and dissolve in alcohol. The mixing process,, incidentally, can produce a mild, somewhat pleasant buzz, with little or no hangover.
Shellac comes in two main forms, the not as expensive "with wax" "buttons or flakes and the prohitively expensive "dewaxed" flakes only form. The former has exotic types like Kusm and Button Lac, while the latter has more upscale names like garnet, lemon, blonde, super blonde and platina. The ground material is dissolved in denatured alcohol (though some prefer to use anhydrous methylate with minute quantities of methyl chlorate or methyl anhydrate powder, with perhaps some ground up natural pearls). The ratio of dry flakes to liquid solvent is called "The Cut". One pound of shellac dissolved in one gallon of solvent is called a One Pound Cut. You supposedly can go up to a Three Pound Cut, commonly sold in premixed cans at paint stores. When you've got the shellac ground up and weighed out it'll look like trying to dissolve 10 pounds of powdered sugar in a teaspoonful of water. After interminable shaking, stirring and swirling, the ground shellac will, if you started with raw ground shellac, eventually get to a lumpless "liquor" of some of the most beautiful clear liquid you've ever seen
There are several fool proof methods for creating an almost flawless finish with a depth that will astound you.
The most time consuming method of applying shellac is called a French Polish. This method uses what is called a Muneqa, which is Spanish for "little doll". Start with a softball sized wad of sheep's wool, washed, bleached and carded. Place the wool wad in the middle of a 9 and 3/32nds inch square of old sweatshirt material, fuzzy side to the inside. Then wrap that in a 10 and 5/64ths inch square piece of Irish 3000 count linen..
Now pour some of you shellac liquid into a special thin nozzle squeeze bottle, called a "special thin nozzle squeeze bottle" screw the special thin nozzle onto the squeeze bottle and squeeze the shellac liquid onto the wool center of the muneqa. Tightley wrap the piece of sweatshirt around the balled up wool and apply a little more shellac to the bottom of the outside of the balled up wool/sweatshirt bundle. Place this bundle into the center of the linen square and bring the four corners of the square together. Bring the resulting newly created four corners together with the first set of four corners and twist them all tightly, twisting in an anti-clockwise direction until the bottom of the outside of the linen becomes damp but not dripping. Next, tap the resulting muneqa on a candy maker's piece of fine Italian marble that has been ground to within 0.00001 inches of perfectly flat and chilled to 7.375 degrees Celsius. This marble tapping will make a flat bottomed muneqa with rounded edges.
You're almost ready to begin French Polishing. But first pour one and one half liquid ounces of fine cognac in a snifter with a 3 4/7ths inch diameter neck. Sniff the cognac before hooking the content of the snifter in one gulp. WAIT 30 SECONDS BEFORE TRYING TO BREATH THROUGH YOUR MOUTH.
Now, before the cognac kicks in, begin rubbing the dampened but not soaking wet muneqa on the surface to be finished. Apply only enough pressure to cause the vein in your forehead to become visible. A lighted, magnifying mirror is handy to have to know exactly when you're rubbing hard enough. The popping and cracking of knuckles can also be used to tell when the pressure is correct, sort of like a break wrench. Rub clockwise for three consecutive revolutions and then three anti-clockwise/counter clockwise revolutions before moving off the spot you're rubbing. Every 8.29 seconds open the wad/muneqa and squirt in some more shellac liquid. Repeat the process on the adjacent area, making sure to overlap the previously rubbed area by half. By the time you go over the entire surface once the place that you started will be completely dry AND a year of your life will be gone. Repeat the whole thing three more times and you'll get a finish that looks a mile thick - and show all those sanding marks you forgot to get rid of BEFORE you began French Polishing
.THE "TOUCH AND GO LANDING" FINISH APPLICATION METHOD
You'll need a brush made from the eye lashes of a brahma bull. The bristles must be at least one inch thick and four inches wide. While this type of brush is very expensive, brahma bulls don't give up their eye lashes easily, the finish they can (note I said "can" and not "automatically will") produce is astounding. Dip the first 8 to 10 mm in the jar of shellac, take it out of the liquid and tap it against the side of the jar until it's almost dry. DO NOT shake it. Quickly move the brush so the bottom edge is parallel to the surface you want to apply shellac to and about a quarter inch above it. With a moderately slow but even stroke, lower the end of the brush following an 8.3 degree glide slope until you have touch down. Then glide the brush along the surface until you're about 12 to 15 mm from the end of the piece. At that point, start your "take off", along the 8.3 degree take off slope. You should "leave the ground" when you run out of "ground".
Quickly return the tip of the brush to the jar of shellac, do the dip and tap thing and do another Touch and Go, this time overlapping the previous pass by 1/4 inch. The shellac from the previous pass should still be wet, or at least not bone dry. This will allow this pass to flow into, then flatten with, the previous pass. Sounds easy and straightforeward. It ain't. If you wait too long you'll get a series of nice parallel little, but very visible, ridges at the edges of each pass. Repeat the dip/tap/touch/and go process until the entire surface of the part being finished has been landed on. The key to this method is to maintain a wet edge.
DO NOT, UNDER ANY CIRCUMSTANCES, TRY TO GO OVER THE SAME AREA TWICE BEFORE THE FIRST PASS IS COMPLETELY DRY. YOU'LL GET NASTY BRUSH MARKS THAT WILL HAVE TO LATER BE SANDED OR SCRAPED FLAT. Word to the wise...
POUR IT ONE, TILT THE PIECE 'TIL THE EXCESS RUNS OFF THEN TILT IT THE OTHER WAY
Also known as "the impatient method", this is a quick way to build a finish. It won't be a uniform thickness and it may have runs and drips in it, but it builds fast. You won't actually save any time since the time saved applying the finish is much less than the time it takes to level the finish once it has dried. But if you're in a hurry, want to cover a lot of wood quickly and don't care about what the final finish looks like, then this may be the method for you.
If you already have a compressor that'll put out 50 to 100 CFM at 3000 psi you might want to get one of them Critter type sprayers or, if you have more than $40 US, get a real air gun, with fourteen tips, two or three finish cups and a viscosity cup. Fill the latter with brandy or cognac and quickly hold it over your open mouth. Begin counting "one Mississippi, two Mississipi" (do this mentally cause if ya try counting out loud while your poring booze in your mouth ya'll are gonna choke and cough) and continue counting until the cup stops dripping. Swallow the cognac and then write down the last "Mississippi" you counted, labelng it “Cognac 1”. Repeat this step three or four more times, recording your highest "Mississippi" and labeling it “Cognac 2” and so on.. Next, fill the viscosity cup with your shellac mix. As the shellac begins to run/drip/ooze out of the cup begin your "Missippies" count until there is no more drips of shellac from the cup. Write this number down and label it Shellac.
You now have the "Mississippies" for Cognac 1, 2, 3 and 4 along with the Shellac Mississippies. Add up Congac 1+2+3+4 values and divide by four. Write the results in the palm of your left hand if you're right handed or in the palm of your right hand if you're a southpaw. You want to record four significent digits - so try to write pretty small - but not too small cause ya'lls visual acuity is failing due to them four shots of whatever that stuff was.
Oh - don't breath on no open flames fur a wile cause ya'lls mouth may 'splode - OK? Ya gotta be safety conshus yu know - don't want no fahrs or blowed up stuff in da shop. Ya unnerstand whut I'm sayin' man? NO fahrs! NO blowed up stuff! No man, I'm serious! Pay attention man! NO blowed up stuff in MY shop! Dis is really, really, really, really important - NO BLOWED UP STUFF IN MY SHOP MAN! You bet I was YELLING cuz I wanna make sure you unnerstand
- n o ...b l o w e d ...u p ...s t u f f ...- OK? No fahrs neither man - OK?
What were we doin'? Oh yeah - viz coz oh tee. Divide the Shellac Mississississippies by the numbah ya wrote on ya'lls hand and write down the results in black marker on ya'lls fo'hed and then turn off the shop lights and try makin' it to ya'lls bed. Tammara, when and if ya'll can get outa bed ya'll will see somethin rit on ya'lls fo'hed when you look in the mirra while tryin' to toothbrush that bottom o da birdcage taste out ya mouth. By now the ole eyes shud be focusin enuff to read dat numba. Write it on da mirra with tootpaste so yu'll see it da nex day. Go back to bed and try an sleep it off. In a day or two yu'll feel well enuff to get back in da shop, but ya'll will be wonderin' who wrote on ya'lls mirror with toothpaste. Forget about that, just go spray on your shellac. The finish you get will look like crap, but when you're still hung over, the quality of the finish won't be a big deal - until tomorrow.
BTW - the alcohol in the shellac mix is highly flammable/inflammable. Do not light a cigaretter, cigar, pipe, joint or bong in a room full of a very fine mist of alcohol. An open flame in the same room, say in a furnace or maybe a water heater, can create the same potential disaster. At best, the flash burn you'll get won't look like the nice sun burned look you get in Cabo or The Keyes. At worst the BOOM can make the quality of the finish you get the least of your worries. On the plus side, the finish will have plenty of time to cure while you're in the hospital.
If you want to reduce the risk of burns and/or explosions, try an HVLP system. HVLP stand for High Velocity Low Pressure. That means you can apply lots of finish at much lower pressure than with a conventional compressed air gun. That means that more finish makes it to, and stays on, the work with much less bounces back into the air. That's a good thing and a bad thing. With this method finishing screw ups happen faster and worse than with conventional compressed air gun spraying.
Rather than a compressor generating a little air at a high pressure, HVLP systems use a single, double or triple turbine to move a lot of air. The turbine(s) are basically the same as that found in a household vacuum cleaner, only much more expensive. The turbine(s) are also LOUD and have to be relatively close to the HVLP gun and therefore to YOU and your ears. Wear hearing protection or get use to saying "WHAT!?"
While on the subject of safety, regardless of the method of spraying shellac, you don't want to get much of this stuff in your lungs. You can eat it, but don’t breath it. If you're going to spray in a confined space with poor ventilation, practice holding your breath for for to five minutes, the time it takes to apply a spray finish to the average piece of furniture, OR, get, and wear, a respirator mask - the kind with the activated charcoal cannisters. You'll have to decide whether you want to be a lung or liver donor should you die prematurely. If it's the lungs you want to donate then wear the respirator and/or do your spraying outside. If it's your liver you want to donate skip the viscosity procedure..