Setting up a Panel Raising Bit presents several challenges. It's a BIG bit and requires a BIG gap in the router table's fence - a 3 1/2+ inch gap. The JoinTech Cabinet Maker Fence is a split fence system - WITH Zero Clearance Inserts. Once the bit height has been set, you can cut it's profile in a blank Zero Clearance Insert. THAT makes working with this bit A LOT SAFER. When you're mentoring a newbie woodworker, safety is the Number One Priority
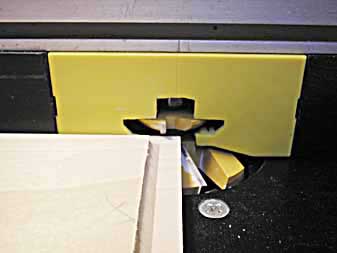
Here's where it gets "interesting". You have to get the bit height set up correctly BEFORE you can make a Zero Clearance Fence Insert for it. THAT means that all the test cuts have to be made WITHOUT a zero clearance fence insert. THAT means working with a 3 1/2" GAP in the fence. And when the test pieces are only 5 or 6 inches wide there's not much wood against the fence while routing acrossed The Gap.
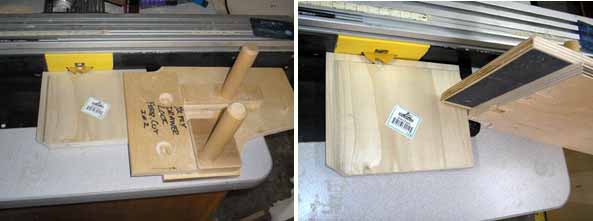
As cautioned earlier, the LAST thing you want to happen is to have the part pulled back into and behind the fence face. So having some sort of device to hold the part and discourage it from being pulled into and behind the fence is a prudent thing to have. The one in the photo below is a shop made version - with 80 or 100 grit sand paper glued to the underside that will be in contact with the top of the part being routed. You can buy a commercial "Coping Sled" which does the same type of thing - most with at least one hold down clamp, some with two clamps.
Getting this bit set up right involved multiple passes on each trial set up - incrementaly sneaking up on the full profile - then testing the fit in one of the door frames. That required routing two adjacent sides for each trial set up in order to see how far off the panel face was from the face of the rails and stiles frames. I did the test set ups because it's not the sort of thing a Newbie should try doing.
NOTE: More about the jig in the above photos and another for holding a part vertically can be found HERE
(close that window when you're done with it)
Once the bit height was set correctly there was still the matter of cutting the profile in a special plastic fence insert the JoinTech Cabinet Maker Fence has. You pull the fence back behind the bit, place a new blank insert in the fence, turn on the router and SLOWLY advance the fence - and insert - into the spinning bit. The bit will then cut it's profile - at it's set up height - through the plastic insert. Of course this required stopping the process, backing off the fence, removing the insert and manually cutting out an opening for the nut on top of the bit. Only then can the insert be reinstalled in the fence and the cutting completed. Time consuming - but makes using a bit this size a LOT safer - especially for a Newbie who will be cutting the actual panels - all six of them, all 24 edges, in four or five passes.
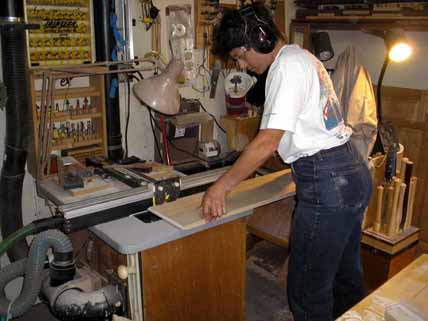
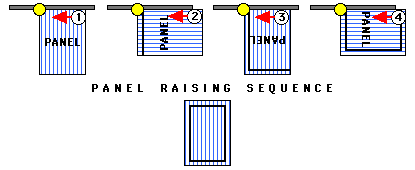
With the bit set up and the zero clearance fence insert in place, routing the door panels a time consuming session of progressive passes - end grain, side grain, end grain, side grain -move the fence back - do it again three or four more times - for SIX door panels.
NOTE:
The order of the cuts is important.. At the end of an end grain pass, the wood about to be cut is unsupported - no more wood behind it - and therefore tends to split out. By starting with the end grain, then doing the side grain, then the end grain and finally the side grain, any split out of end grain is removed by the subsequent side grain pass, leaving a crips profile.
More sanding, more sealing with shellac, more light sanding and everything, except the side panels us ready for applying the "Reddish Brown" TransTint dye.
