OK - so we've got out door rails and stiles ripped to width and the stiles cut to length, the rails cut to their approximate length (more about that in a minute). Time to cut the grooves for the door panels, something we've already done for the side panel - and we have a cut off from grooved side panel as a set up block for the saw height and fence set up. Now all we have to do is more of something we've already done - right?
WRONG!
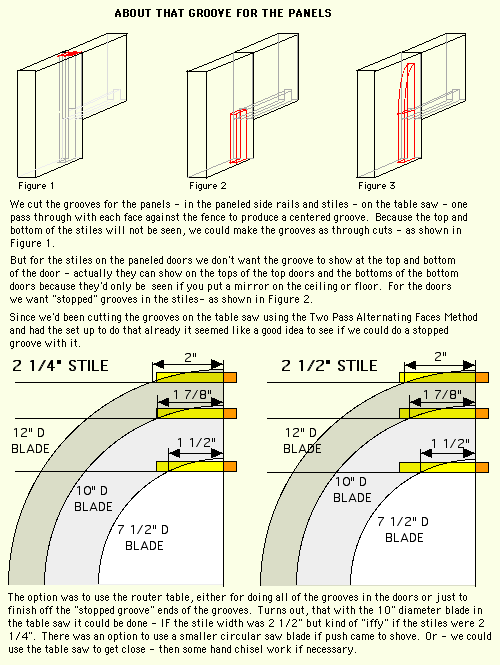
The Novice Furniture Maker wanted to try the "stopped groove on the table saw method".
So, we set the blade height to our 3/8", found where the back of the blade came up out of the saw table top and marked that location on the fence with a pencil line, then did the other end, where the saw blade went back into the saw table top, A "stop" was clamped to the fence for the start of the "stop cut", set about 1/8th inch ABOVE the top of the part to be cut so it can pass under the stop.
NOTE: This operation has the potential for a Kick Back so we a) were using a thin kerf blade and b) lowered the part onto the spinning blade SLOWLY, holding on the the back of the part and pressing it against the fence firmly.
NOTE:
I would not recomend that a novice with the table saw try this operation
with a regular kerf saw blade, especially unattended,
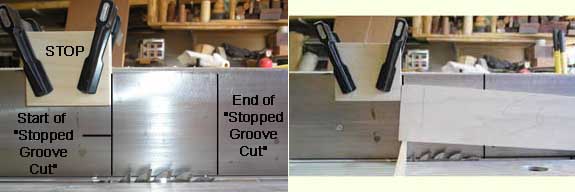
For the end of the groove cut we had to mark a line on the "top" of the part (the bottom of the part where the groove is to be cut is down on the saw table where we can't see it) where we wanted to stop cutting. When that line lines up with the line on the fence we hit the Kill Button on the saw, wait for the blade to stop spiing and remove the part. DO NOT LIFT THE PART AT THE END OF THE CUT WITH THE BLADE STILL SPINNING!
After the Stopped Groove's had been cut on all the door stiles we "throug grooved" all the rail parts - which were cut a bit oversized and not yet to final length. More about that on the next page.