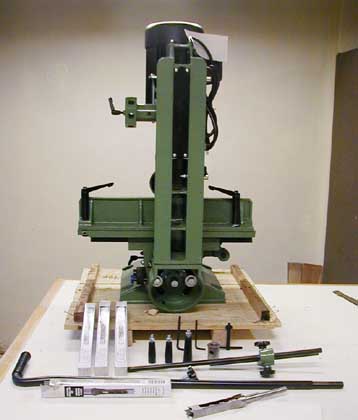
The General 75-075 Tilting Column Mortising Machine
This is the General Interational 75-075 tilting column semi-heavy duty, 182 pound mortising machine. These images were taken just after uncrating. I'm going to build a base unit for it and already have the Shop Fox mobile base it will sit on. Will put up the finsihsed set up when it's done.

Here's what comes with the unit:
- chisels and bits 1/4, 3/8. 1/2 and 3/4", all in need of a little touch up and polshing
- 5/8 and 3/4" chisel collets
- two allen wrenches
- chuck key (non-pop out so I'll have to pay attention and not turn the unit on with the key in place!
- stop bar
- LONG solid steel lever arm with L handle - should keep a lot of the force down the center axis of the unit.
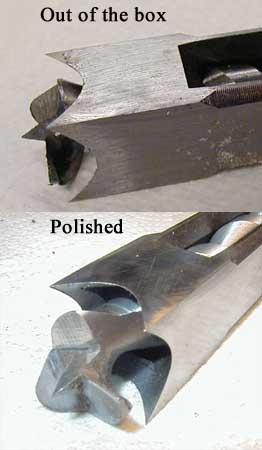
The chisels and bits that came with it had burs on the bits and the chisels needed polishing. A small jeweler's file, some japanese 1000, 4000 and 8000 shaped slips for the bits and medium, fine india stone then finish with a white hard arkansas stone got most of the scratches out of the sides of the chisels. For a tool in this price range I shouldn't have had to spend close to three hours getting the chisels and bits in good working order.
I did some test mortises in some pine and ash. The manual says to use a fast feed rate to avoid burning. Fast or slow, you will get some smoke, not just on the initial cut. I tried different chisel to bit distances but that didn't seem to affect the smoke generation. Perhaps a series of short plunges will eliminate or reduce the burning.
The chuck key is long so it extends outside the chuck housing. A normal chuck key probably wouldn't. There's a convenient clip on the side of the column for the chuck key.
Observations After Actual Use on a Real Project
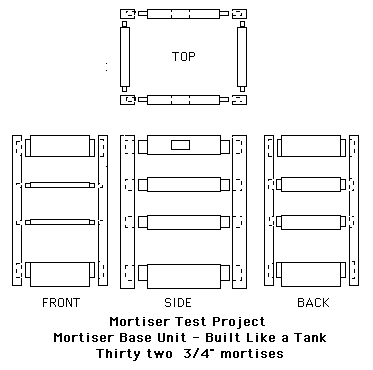
The Test Project was a base unit for the mortiser. The "frame" was made of some old tight grained 2x4s and 2x6s, probably douglas fir. The mortised uprights were ripped down to 1 1/4 x 3 1/4 to get sharp square edges. Here's what I have in mind ultimately.
Here's the mortise and tenon "plan". As you can see, lots of mortises to cut, most 2-3 inches long and an inch and a quarter to an inch and a half deep. This suckers gonna be rock solid and heavy.
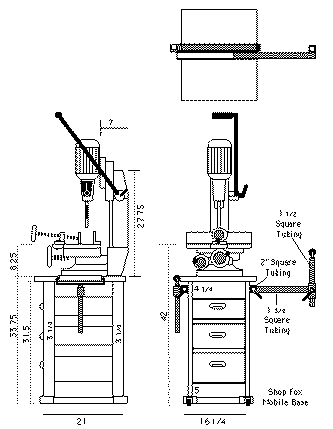
(if you'd like to see more about making the base unit then click here)
I cut the tenons first then used them to layout the mortises. BTW, the Drake wheeled marking gauge is a great tool and perfect for this task. If you're going to make mortise and tenon joints pecise layout is citical. Am about half done and have enough experience with the General to make the following observations:
The unit is heavy duty and quite stabile even when not bolted down - something I shouldn't have done - dumb! Despite cutting deep 3/4" wide mortises, the motor never hinted at straining or bogging down. The long lever arm with its L shaped handle gives you plenty of leverage so you don't have to hang from it to make square holes. The In/Out positioning is pretty precise and holds its setting well even when not locked down - though that's not recomended. The Left/Right Stops hold firmly and the large nobs make tightening them comfortable. The Hold In works great and holds the stock down and in - IF the stock is prepared properly.
The chisels/bits that come with the unit are another matter. As noted earlier, they needed some work before I actually tried the 3/4" set. The bit is the weak point, specifically the spur. The bevel angle is too small and the cutting edge rolls over easily. Will have to rework them or get another pair of 1/2 and 3/4 sets. The Left/Right Wheel is large but not easy to move in small increments with one hand. If it were a spoked wheel rather than a disk this inconvenience would probably go away.
All in all, the General hogs out wood with gusto and pretty good precision. This is definitely not a drill press add on or bench top mortising machine. The XY table cuts down set up time tremendously and I wouldn't be without one ever again. It alone makes these types of more expensive machines worth the extra bucks. I'm sure a better chisel/bit set will really make this unit shine. Picked up a set of Fisch chisels/bits but the set only goes up to 1/2 inch so I didn't try them out on this test project.
GRIPES (minor but worth noting)
The Lever Arm, because of its "L" shaped handle, rotates under heavy pressure, even when the locking levered screw is tightened as tight as I could make it without bending the handle. Solution - will drill and shallow hole in the lever arm.
The Lever Arm Mounting Bracket is connected to the Up/Down Gear Shaft with a pin. There's some slop in the pin and the whole Motor & Guides slips down a little when you raise the chisel/bit to move the work over for the next hole and let up on the lever. Not a real problem but is a little disconcerting. (after further investigation, it's not the pin but the fact that the gear, at the top of its range of motion seems to partially disengage with the rack so perhaps not taking it to the top may eliminate the "problem".)
The Left/Right Wheel requires two hands to move it in small controlled increments. When cutting left to right, it's irriating to have to let go of the lever arm to move the table. A little lubrication should help.
The chisel collet has a slotted hole in it, through which a handled locking screw passes, locking the chisel in place. When the chisel binds hard (like when the stock wasn't flat - user error) you really have to muscle the lever up to get the chisel unstuck. In this type of situation, the collet, which is free to move a little because of the slot, can move, pulling the chisel DOWN with it. That in turn can cause the bit to bind inside the end of the chisel. Makes a hell of a noise and definitely not good for the bit AND the chisel. Going to have to think up a solution or prepare my stock better.
The Hold In won't hold poorly prepared stock down when the chisel binds. A piece with a slight twist in it will be held against the fence firmly but the front edge will be lifted slightly off the table. Under the force of the chisel and bit being driven into the stock, it will flatten out temporarily. When fore is removed the front of the stock will raise up again, binding the chisel. When this happens the Hold In won't hold the stock down as you attempt to pull the stuck chisel up out of the cut. Had to clamp the end of the stock to the table to get the chisel out.
.............NOTE: Make your stock flat, parallel faced with straight square edges and save yourself some grief
The threaded rod/depth stop SUCKS! Given the length of the lever arm and the force it can exert, the stop design just isn't up to the task and slips when you really pull the lever hard. Almost blew out a mortise the first time it slipped - not good since there was no backer board under the stock. Drill bits don't stay sharp when driven into cast iron! Will look into replacing with a speed nut or the like.
(GRIPE MODE OFF)
NOW - if you've always wondered just how much clearance you need between the bit and the chisel and were confused as to where to measure things from check out The Forty Cent Method.
For a lot more details on the unit and a comparison with the PowerMatic competitor CLICK HERE