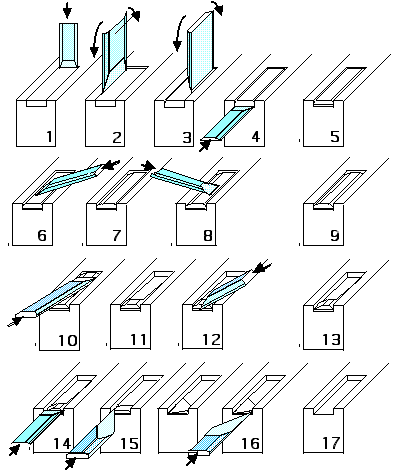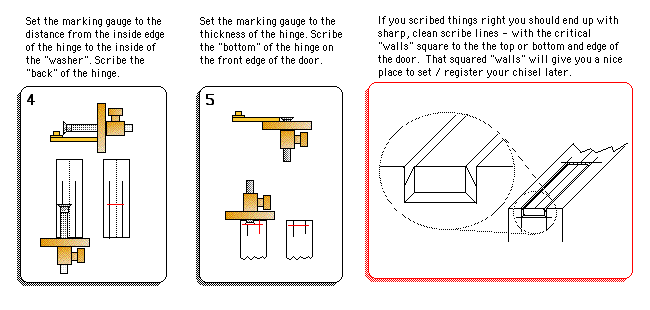
With the clean layout with nice incised lines it was time to do some chiseling and paring. That was relatively straightforeward - EXCEPT for the outside end of the mortise. If you pare outward there's no support for the grain and so it will tear out. Having a pair of skew chisels took care of that potential problem. Here's the process I used.
1. with a quarter inch chisel, litely deepen the scribed back line. DO NOT cut deeply
2. with a one inch or wider chisel, lightly deepen the outside scribe line by rocking the chisel.
.......rock the chisel over the edge of the door to deepen the vertical scibe marks on the edge of
.......of the door
.... .DO NOT CUT DEEPLY - YOU'LL SPLIT THE DOOR!
3. repeat step 2 in the scribe line on the inside side of the door
4.. position the quarter inch chisel a hair above the scibe line on the edge of the door
.......and make a light chop cut
5. you now have the waste portion of the mortise somewhat isolated from the doors
6. with a quarter inch chisel, cut towards the edges of the mortise to give yourself
.......some room for working inside the mortise
7. you'll now have a notch with a vertical wall on the edge of the mortise and a
.......slope from that vertical wall UP into the waste are of the mortise
8. repeat step 6 on the other side of the mortise
9. you've now got the waste area of the mortise ready for paring to depth
10. begin making shallow paring cuts, starting near the back of the mortise,.
......working your way towards the door edge end of the mortise.
11. stop paring about 1/16th of an inch from the door edge end of the mortise
12. paring TOWARDS the sides of the mortise, carefully remove as much of the
...... remaining 1/116th inch of waste
13. the door edge end of the mortise should have a slight pyramid shaped bit of waste
14. make a few horizontal paring cuts to flatten the pyramid.
15. the bottom of the mortise should now be almost flat and close to the depth required
. using a skew chisel, do the final paring to the door edge scribe line to finish
...... of the bottom of the mortise
17. clean up the edges of the mortise and you're done!