What, How and WHY
Understanding parts orientation and manipulation when using a router based dovetail jig system
I'm going to start with a blanket statement which you may - initially - think is pure bullshit. Whether you'll admit that it's true or not is up to you. But the fact is - it IS true.
No matter how careful you are, nor how good you are with layout tools, hand tools, power tools or jigs - and no matter how methodical your are - you will NEVER be able to make perfectly sysmetric joinery - PERIOD. Neither you, nor any tool or machine you can afford, are precise enough to remove ALL human induced error(s). And despite the mathematics of probability, when it comes to dovetails cut with a router and jig, the errors will always accumulate and never seem to cancel each other out.
One of the major difficulties dovetail jig users have is the learning curve "required" to get decent and sometimes near perfect dovetail joints - for ALL FOUR parts of a "box" (drawer, humidor, jewelry box, blanket chest or cabinet or shelf carcase). Though each pair of parts may fit together perfectly, getting them ALL to fit together perfectly - and have ALL the "outside faces" actually on the outside and the top edges to ALL meet flush - can appear to be a Hit or Miss proposition- with the odds stacked against you. THAT'S why dovetail jigs often come with a BIG manual with 100 to over 150 pages of detailed, step by step instructions - with lots of colored diagrams and illustrations which include circles and arrows and NOTE!, WARNING! and CAUTION! - followed by a sentence to a paragraph of accompanying text.
For most amateur / hobbyist woodworkers who get a dovetail jig - it's bought for - and justified by - a specific project, used for that project then put away 'til the next project comes along that needs dovetail joinery (which may be several months to maybe a year later). Very few jig owners use the jig on a daily, or even weekly basis. So the next time the jig is needed most of the "steep learning curve" has to be climbed AGAIN, which includes more reading and studying THE MANUAL before satisfactory results can be achieved. That's the PERCEIVED "reality" when it comes to dovetail jigs. The REAL "reality" is that dovetail jigs aren't that complicated to set up and use properly IF you understand not only the WHAT and HOW of using the jig,, but more importantly - WHY. If you understand WHY jigs require things to be done a certain way the WHAT and HOW is almost obvious - so you don't HAVE TO slog through THE MANUAL before every use of the jig.
I believe the old maxim Knowledge Is Power. If you merely follow a set of Memorized RULES you're apt to forget a rule or two or mix up their order. If you thoroughly understand WHAT you are supposed to do - AND -WHY you must do it a certain way - then you can't screw because you forgot a rule or followed a specified procedure in the wrong order. If you understand WHY you can then figure out HOW - without having to find the manual and reread the instructions / procedures/ RULES.
Hopefully, what follows will provide you with WHY, while going through the WHAT and the HOW of the routed dovetail jig procedure. Once you understand what follows you probably will never have to refer back to the manual about the procedure for cutting through dovetail with your jig.
Here's what we're going to go through - the simplest dovetail joined project - a box with one TAIL and two Half Pins on each corner
The first thing you must understand
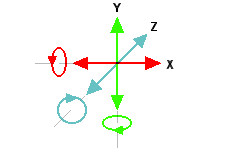
A router based dovetail jig system requires that the parts be kept in a fixed position relative the thejig for each routing operation. THAT means restricting SIX possible movements the part CAN make if not restrained. (you forgot about rotation didn't you?)
And here's how that is done:

The dovetail jig has THREE references that fix the location of the part to be routed relative to the jig
- the left edge of the part against the jig's left "stop / fence"
- the top of the part against the underside of the "guides / fingers"
- the back of the part against the jig's rear "stop / fence"
The second thing you must understand
The jig dictates HOW the PINS MUST BE ROUTED.
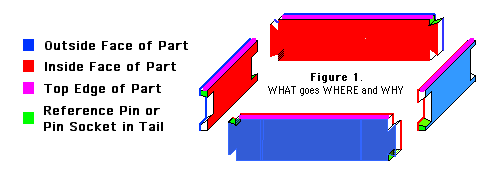
Look at the following illustration until this point is burned in your brain - BLUE is the OUTSIDE of your BOX and you have to SPIN THE PINS PART after you've routed the socket(s) in the first end. The face of the part that you can't see is the inside of your box. We'll get to the rest of the color coding soon - bear with me please. Just note that the "half pins" ARE NOT THE SAME SIZE .
The dovetails for the following example are intentionally asymetric to emphasize the importance of the parts' orientation and required manipulation when using a router based dovetail jig system- not just the AKEDA - but ALL router based dovetail jig systems.
Cutting the PINS - OUTSIDE FACES YOU - PART ROTATED 180 DEGREES AS SHOWN BELOW.
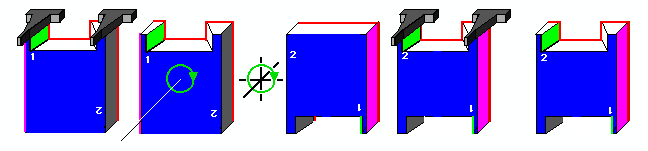
SO - when you're routing the the PINS parts
1. the "OUTSIDE" face of the PINS part must ALWAYS FACE YOU
2. one EDGE of the part must be against the jig's left "fence' / "stop"(or the right "fence/stop" - just be consistent)
3. the end of the part you're going to route must be flat up against the bottom of the dovetial jig's guides / fingers
That means that after you've routed the sockets in one end of a Pins part you MUST rotate the part 180 degrees with the OUTSIDE FACE (BLUE) ALWAYS FACING YOU.
NOTE: If you flip the part END FOR END - so the OUTSIDE FACE is then away from you - and then route the second pins you'll get a part with a dovetail on one end and a TALEDOVE on the other ( the wide ends of the pins will be on opposite faces). And if you start with the INSIDE facing you - the nice pretty show face for your drawer will be on the INSIDE of your drawer - the ugly face you wanted hidden inside the drawer will now be out there for EVERYONE to see and maybe ask "Why the hell did you go to the trouble of dovetailing this drawer and yet have such an ugly face on it?
Here's the simplest through dovetailed box you can make - one Tail and two "Half" Pins. You saw it earlier but now that you understand how and why the pins parts are done the way they must be done you know why the location of GREEN is important.
What you need to "get" is that the parts can only be put together one way - if you want to keep the "outside" actually outside and the "inside" actually inside - AND the top and bottom edges lining up It's the PINS that define What and How the parts are placed in the jig and routed.
Because of their shape, YOU MUST ROUTE THE PINS PARTS WITH THEIR OUTSIDE FACE FACING YOU. (BLUE face facing YOU)
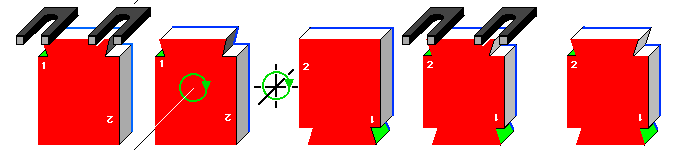
Given the requirements of routing the PINS, the PINS then dictate HOW the TAILS must be done.
Cutting the TAILS - INSIDE FACES YOU - PART ROTATED 180 DEGREES AS SHOWN BELOW.
This" Jig Imposed Pins Asymetry" is the major source of User Error - Improper PARTS ORIENTATION and PARTS MANIPULATION. At every step in routing the dovetail joint on a part you have a 50-50 chance of guessng which face should face YOU. And for each part you cut, you have a 1 in 3 chance of guessing how to rotate the part. Given those odds, understanding WHY things have to be done a specific way, ups your odds of cutting each end of each part correctly - and having everything go together properly when you're done routing the joinery.
Now if you want a ONE PAGE summary of all of this - that you can print and keep with your jig - CLICK HERE