AKEDA MODEL DC-16 DOVETAIL JIG REVIEW (16" stock width capacity) [and a little history of the AKEDA for the Trivia Buffs]
READER: What follows will probably be more than you ever wanted to know about dovetail jigs and the AKEDA dovetail jig. Personally, I'd rather have more informatin than I THINK I need than too little information that I probably ACTUALLY need. Rather than present the information as a manual would, I'm going to give you the Hows and Whys, warts and all, as if we were in my shop going over this thing - with a cup of coffee in our hands (Coca Cola for me) - me doing the show and tell and you asking questions.
You can skip over the History of The AKEDA and scroll down to The Review if you're impatient.
Let's begin.
THE HISTORY OF THE AKEDA DOVETAIL JIG
I first got wind of what was to become the AKEDA Dovetail Jig when someone posted a question to one of the woodworking forums I participate in - probably in the usenet newsgroup rec.woodworking. The question asked was "What would you be willing to pay for a router based device that would cut perfect, variably spaced dovetails, both through and half blind/half lapped, in 1/4" to 1" thick stock - without any test cuts?" (THAT last part really got my attention!). A link was provided to a web page with a virtual 3-D model of the tool which you could look at and virtually manipulate - zoom in, zoom out and rotate about any of the 3 axis. The accompanying text described the device's capabilities AND that it required NO TEST CUTS. Here's a picture of the virtual model. HOW it would do what it was purported to be able to do wasn't described.
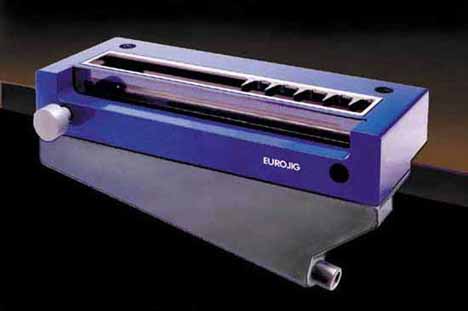
A dovtail jig that works with NO TEST CUTS? Yeah sure - when pigs fly! (Reader: Please note the When Pigs Fly part)
This was in mid 2001. Sounded like VaporWare - an idea being floated to see if there was a market - none of the details worked out - to be firmed up if and only if there was a profitable market for it.
I'd already checked out router based dovetail jigs - Keller, Katie, Porter Cable and LEIGH. I almost went that route. But I saw the JoinTech router table and fence system, saw that it would do what the dovetail jigs would do - including the variable spacing of the LEIGH - AND - a lot more ( a router table with a precision positionable split fence - with replaceable zero clearance fence inserts - can do a LOT more things than a single purpose jig) for about the same price - so I got the JoinTech Cabinet Maker System. The EUROJIG and the LEIGH DT Jig fell off my Tools Acquisition List.
But the LEIGH DT jig was still on my Some Day - Maybe . . . List. Those sliding fingers, set screws and allen wrench, that fine lines scale, the "Flip It Over To Cut The Pins" - all that appealed to the engineer in me. But the engineer in me saw the complexity of the idea and all the things that could go wrong (User Errors) - to say nothing of supporting a moderately heavy Porter Cable router on those "slide to set" aluminum fingers, attached just in the middle and held there with a single set screw. Great idea - not so great engineering. To many opportunities for Murphy's Law to kick in.
A year or two after first seeing the virtual model of the EUROJIG, the AKEDA dovetail jig actually came on the market. The dust collection part had been significantly changed but the rest looked the same as the EUROJIG virtual model. The price tag of around $600 for the complete package shoved it right of my "I'm willing to pay that to find out IF it'll do what they say it can do." list. I'd wait for some reviews of this thing to see if it worked, and hope the price would come down. And slowly, reviews of the AKEDA began to appear in woodworking magazines. Owners started posting their experiences with it in various woodworking forums on the net. The user feedback was that it worked great and was easy to use - but the price tag was a bit too steep for most amateurs / hobbyists. The other thing was availability. You couldn't easily get your hands on this thing and check it out BEFORE paying or it. But the price tag - "loaded" had dropped to below $500.
About the time I was ready to get a dedicated dovetail jig (hey - I'm a Tool Phreak), the AKEDA factory and warehouse burned down. With production AND inventory gone it looked like the AKEDA was done for, another great idea that fate would doom to extinction due to unforeseeable circumstances. Pity, since the AKEDA promised so much - and delivered.
Then, like the mythological Phoenix, the AKEDA rose literally from the ashes. A major woodworking franchise stepped in. They would provide a loan to rebuild the production facility - apparently in return for exclusive rights to sell the AKEDA for a specified period of time.
END OF THE HISTORY LESSON
Begin WHY I BOUGHT THE AKEDA
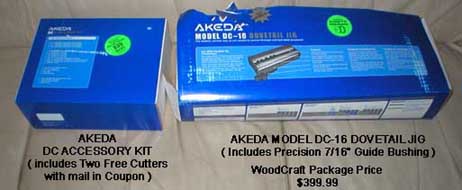
I'd been thinking about getting the AKEDA dovetail jig, but the package price for the whole set up was a little steeper than I had in mind - about $575, give or take a few bucks. When someone posted to the newsgroup rec.woodworking that WoodCraft had a package deal - $399 for the jig PLUS the DC Accessory Kit - I had to check it out. I'd gone through John Lucas's web pages on the AKEDA so I had an idea of how this thing worked and liked what I saw. But I want to see AND touch a tool before I plonk down $400 of my hard earned money.
I was impressed by the heft of this thing. It's beefy, solid. The fact that the manual was only 43 pages was a bit of a concern, the LEIGH dovetail jig has a nice big 160 plus page manual with plenty of photos, diagrams, line illustrations, shaded color graphics and all sorts of circles and arrows - with notes attached. And the manual, while spiral bound so it opens flat and stays opened flat, was an odd size , 5 1/2" tall and 13" wide - with a Pink Flying Pig on the lower right corner of the back cover! (remember the note at the beginning of all this about When Pigs Fly?)
THIS thing is DIFFERENT!
So I bought it.
The Review The Review The Review The Review
I'm going to try to describe why the AKEDA is significantly different from, and, IMHO, better than, ALL the other router based dovetail jigs on the market that I'm aware of (and remember, I'm a TOOL PHREAK). A statement like that may set off all kinds of alarms and warning bells in your head - "This guy's a shill for AKEDA, paid to persuade woodworkers that they HAVE TO HAVE an AKEDA. What follows must be an advertisement disguised as a tool review."
Well put down your pitchforks and dowse your torches. I have NO connection or affiliation with AKEDA, it's distributors or any company associated with either. I buy tools I believe will be of use to ME, and pay the going price for it - no special pricing in return for a good review - nothing - zip - nada. My money, my opinion - that's it. If the information that follows helps a woodworker to decide to get an AKEDA - or not - I've put back some of what I've gotten from other woodworkers who've helped me.
The Akeda is to the other dovetail jigs what Apple is to MicroSoft - or what the original MacIntosh computer was to a DOS PC.
(unless you've been playing with computers for quite a while you won't fully appreciate what that means)
The AKEDA was designed by starting with a blank sheet of paper and a set of thoroughly thought out design criteria that focused on accuracy and ease of use - not the cost or ease of manufacturing, not a target retail price points dictated by a marketing analysis. Durability, Function and Ease of Use FIRST - THEN worry about how to get the cost of production down WITHOUT compromising Function or Ease of Use.
The AKEDA is a Fourth Generation Router Based Jig System.
Let me explain that term.
When hand held routers became readily available, woodworkers started looking for ways to use one to make cutting dovetails faster and easier. The idea of making templates for the router to follow was hit upon early and all sorts of simple jigs came out using that idea - the Keller Jig being one of the FIRST GENERATION router based dovetail jigs. They provide the metal template(s) - you're responsible for coming up with everything else you need to use the template with your router and figure out how to position the stock - and keep it there.
(for the woodworking history buffs, a guy named Art Espinet Carpenter up in Bolinas, California, was one of several woodworkers who came up with the template idea. His apprentice thought that a metal template would be more durable and more accurate than the masonite / tempered board templates Espinet had made - so he made, or had made, TWO steel templates - one for Ed and one for himself. They worked! Soon other woodworkers in the area saw one and wanted one. The apprentice proposed that he and his mentor become partners in a sideline dovetail jig business. Ed Espinet Carpenter wasn't much for "business" - his passion was furniture making, not tool manufacturing, and definitely not into "business". So the apprentice was given unconditioned permission to use the steel template idea however he wanted to use it - no strings attached. The apprentice's last name is Keller - THE Keller in Keller Dovetail Jigs).
The SECOND GENERATION dovetail jig took the metal guide template idea and added parts for clamping to make an integrated jig.
The THIRD GENERATION dovetail jig introduced Variable Spacing. Rather than a fixed spacing pair of metal guide templates (one for pins and one for tails) or a "both pins and tails on one template but still with fixed spacing" - why not make individual sets of pin and tails and be able to slide them around on some sort of support bar?. Put them where you want them and secure them there with set screws. The LEIGH Dovetail Jig was born - and has been evolving since - improving the clamping system, adding cam lever clamps rather than nobs, adding a front support bar to keep the front of the router from tilting instead of relying on the "finger guides" to be the sole support for the router, adding a dust collecting gizmo, adding a depth of cut / joint fit feature, etc. A slow incremental, evolutionary refinement of the original idea. LEIGH did a much better job desigining their LEIGH FMT mortise and tenon jig, perhaps taking a lesson from AKEDA's design approach - develop the design criteria fully first - then design the jig. Compare the LEIGH FMT with even the newest LEIGH DT jig and the contrast of the two design approaches will be very obvious.
Now the FOURTH GENERATION Dovetail Jig - the AKEDA - has come along. It's design starts with what was learned from its predecessors and utilizes things that TODAY's manfuacturing materials and technology make possible - at an affordable price. THAT allows for accuracy, precision, durability and flexability to be built into the jig, rather than provided by the user (who may or may not be able to provide that required precision) or "improved" with add on attachments / accessories . We users are human, not machines. The shortcomings / design flaws of the previous generation of jigs are now rectified - the "fixes" are built right into this integrated jig system instead of "afterthought bolt ons". ALL the things a dovetail jig needs to do are "built in" - with one exception that ALL router based dovetail jigs have and which I'll get to later.
(Reader: When you get to exploring the AKEDA web site you'll come acrossed this Fourth Generation term. I wrote what you've just read - BEFORE I saw it on the AKEDA site. Just proves that even when you think you've come up with something original - somebody probably had the same idea - "there's nothing new under the sun" is pretty much true. But don't let that stop you from creating and innovating - and having fun doing it!)
Back to the AKEDA - here's what you get for $400 - a dovetail jig with a SIXTEEN INCH width capacity that'll do variable spaced finger/box joints, through dovetails, half blind dovetails-in both flush mount and overlay drawer fronts - and sliding dovetails. AND - you get FIVE dovetail angles - 7, 9, 11, 14 and 20 degrees as well as the ability to route dovetails in stock as thin as 1/4" and as thick as one inch. That's just some of many "little things" that sets the AKEDA apart from all the other router based dovetail jigs.
Here's what's in the jig box. Note that the body of the jig is steel and aluminum. It has NOTHING sticking out and only two moving parts - the horizontal clamp and the vertical clamp which - you can't see because they're inside the body. What you start with is a nice, big, solid surface to support your router.
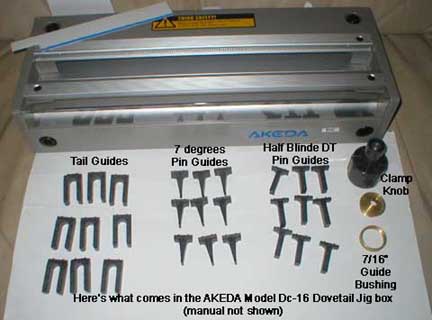
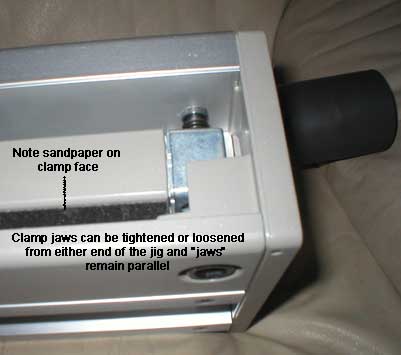
See those black circles on the top and front corners? See that ONE clamp knob/nob? THAT's how you tighten each clamp - no cam levers, no handleS sticking out. ONE HAND clamping. THAT means you have one hand free to hold the part while you're clamping it in place. Not a big deal for clamping something horizontally. It IS a BIG DEAL when trying to clamp a part vertically AND against a back and side fence. Turn that one nob - on EITHER END of the clamp - and the other end turns with it - keeping the clamping jaw moving PARALLEL. That "little" feature is what makes the Veritas Twin Screw vise so popular with woodworkers who make their own dedicated woodworking bench - no "one side tigher than the other" problem or potential problem.
Oh - BTW - since you can tighten the clamps with just one hand, right OR left, your other hand can be holding the part where it's supposed to be while you tighten the clamp.
In addition to one hand operation, the moveable clamp jaw for vertical parts allows you to clamp your part either in front of it or behind it, holding the part firmly against the front or rear of the opening in the top of the jig - and the part will ALWAYS BE SQUARE TO THE TOP OF THE JIG (and therefore to the base of your router). THAT allows you to do both through dovetails AND half blind/half lap dovetails - without having to move any "assemblies" around, or reading and set any fine lined scales. THERE ARE NO SCALES on this jig - they're not needed.
Note: The base of the router is well supported, back AND front, by the BEEFY FLAT top of the
jig body - ABOVE the guides NOT ON THEM. And there's no bolted on front support bar added
on as an afterthought. This is IMPORTANT. If the base of the router tips - AT ALL - the fit of the
dovetails will be compromised. If you're going to take the time to cut dovetails you want them to fit
together PERFECTLY - every time.
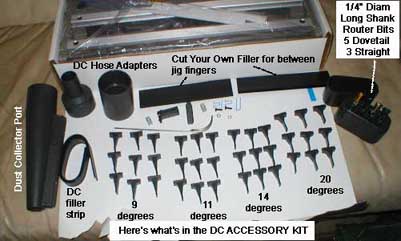
Here's what's in the DC Accessories box. This rounds out EVERYTHING available for this jig.
Note: Unlike the dovetail jigs that have one set of the tail guides and the pin guides back to back,
the AKEDA has ONE set of tail guides and separate sets of pin guides, one set for each of FIVE
dovetail angles, not just one . Each one has the angle stamped right in it so you can't inadvertantly
mix them up. More parts to keep track of but more options/ flexability for your joinery.
With the jig and the DC Accessories Kit you can do through dovetails in stock from 1/4" to 1" thick and half blind dovetails in 3/8" to over 1" thick parts. And you have five dovetail angles available - 20, 14, 11, 9 and 7 degrees respectively. A 0.315 straight bit is also provided and used first then the dovetail bits. You need to hog out most of the sockets with the straight bit because the shanks on the dovetail bits are 1/4" diameter and extra long - not real beefy. But this is true of all the variable spacing router based dovetail jigs.
GRIPE: Since dovetail jigs require TWO router bits and a guide/collar to make dovetail joints - why the hell don't they come with TWO guide/collars? The trickiest part of routing dovetails is the Depth of Cut. Getting the right depth of cut is somewhat of a PITA. Blow the depth of cut and you end up with a joint that's either too loose or too tight. Once you get the right depth of cut, losing it when you change from one bit to the other SUCKS! With TWO guides/collars you can set up TWO routers, (come on folks - everyone ends up with at least two routers), one for the dovetail bit and one for the straight bit. When you get the depth of cut right - FOR THE THICKNESS OF THE STOCK YOU'RE WORKING WITH - you can cut dovetails all day long - ASSUMING YOU'RE STOCK THICKNESS STAYS THE SAME.
NOTE:
THIS IS IMPORTANT
The correct depth of cut is critical to the joint fit and it's dependent on the thickness of your stock. So router based dovetail jigs that advertise that THEY have a depth of cut setting jig that comes with their dovetail jig which GUARANTEE a perfect fit every time are, at best, misleading you. Here's why.WOOD MOVES! Even if you prepare your own stock - properly - AND plane it to EXACTLY say 3/4" (0.75000000000") thickness, by the time you're done cutting the all the dovetails for a project, even assuming the elapsed time from "out of the planer" to "done cutting ALL the dovetails" is a couple of hours, the thickness of the last part you cut will be different from the first part you cut when it was prepared. - and that's assuming you had the wood acclimatized to your shops temperature and humidity to begin with.
Even if you buy "S4S" boards (Surfaced 4 Sides) sold as "3/4", even if it's "kiln dried, it seldom, if ever , will in fact be exactly 0.7500 inches thick to begin with, and probably isn't "four square" (opposing faces flat and parallel, edges straight, corners square).. ALL dovetail jigs require that the stock be prepared properly (four square), Any corner that isn't "square", any edge that isn't straight and square to the adjacent face, any face that isn't flat - and you won't end up with nice properly tight joints. So - to get the stock properly prepared - with no bows, no crooks, no cupping, no twisting - YOU have to make that happen - or at least check that all the criteria are satisfied. How thick your stock is isn't as important as having all the parts that are supposed to be the same thickness ACTUALLY BE THE SAME THICKNESS.
SO - despite what the advertisement says - you will probably need to make test cuts to get the router bitS (plural) depth of cut right for YOUR ACTUAL STOCK THICKNESS.
This was noted before but worth repeating. The parts Clamping System is kind of slick. The moveable jaw has sandpaper on its face (BOTH faces on the horizontal part clamp) to increase the grip on the part. A little extra friction is better than a little extra clamping force - which often seems to turn out to be TOO much clamping pressure. A single, removable knob for tightening and loosening the jaws can be used from either side of the jig - leaving one hand free to hold the stock - nice for lefties or righties - and folks with only two hands. The jaws remain parallel regardless of which side you use to tighten or loosen them - with just ONE HAND. Now this doesn't seem like a big deal. But if you've tried the "other" clamping methods you know that they require TWO HANDS. What's holding the part in postion while you're locking down both ends of the clamp - your knee? The last thing you want is to have the part cocked, even just a little. Well thought out and elegantly simple -to use. These "little things" are what makes the AKEDA different from all the other dovetail jigs - and better, IMHO.
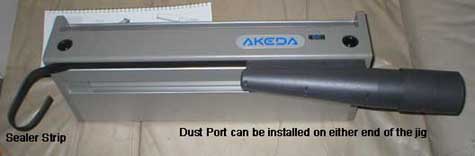
The dust collector port, which clips in, also allows for mounting on the left or right, with a rubber sealer strip that slips into slots on the bottom of the jig to improve the dust collection. Simple, flexible and again - elegant. Two adapters are provided to connect to standards vacuum hoses. Nice that AKEDA thought to include the adapters. I HATE having to find things that should come with a tool - don't you?
Here is THE KEY to the flexability of placing the pin and tail guides - spacing is in discrete 1/8th inch increments. Again, a simple to use, effective and elegant solution to a design challenge. You CAN"T misalign the "other fingers" once you set up and cut the first set - get even Fat Pencil Line close and you still get great results - without any squinting - without flipping anything around.
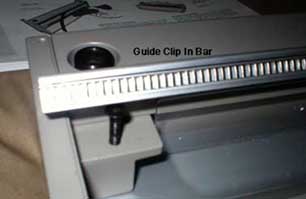
Here's yet another elegant idea built into the AKEDA - the way the guides are made. Two "fingers" on the back of each guide fit in the space between the "rungs" on the "ladder" guide clip bar. The guides will ONLY snap in place at discrete 1/8th inch increments. Between those two "fingers", each guide has an easy to see Centerline cast into the guide. A simple pencil line on the top of the jig is all that's needed to locate where a guide is set, or must be set - and it only has to be close, not exact, because the guides will only snap in place in discrete 1/8th inch increments. (Read that again. You only have to have the approximiate location of the centerline of the guide. The "ladder" and the "fingers" will automatically set the EXACT, repeatable, location - from either end of the jig. Get close and the jig will provide the precision. Handy yes?)
