AKEDA Dovetail Jig
OK - so let's get to using this thing.
How Does It Work?
I could answer this question - but the info on the AKEDA web site describes how the jig works far better than I can. You should note that the manual is all of 43 pages - and the pages are only half a page wide - though on legal sized paper (5 1/2" x 13 1/4" actually). The "other" manuals are in the150 to 160 pages range - without the Addendums. Does that tell you anything? To me, if something requires a lot of reading - and undestanding - a book sized manual - then "it", whatever "it" is, IS NOT intuitive or User Friendly (to borrow a phrase from the computer world). I want to cut dovetails, not study manuals. The flatter the learning curve the more I like it.
(there's a link to the AKEDA website on the LINKS page of my AKEDA stuff. You'll find out a lot more about the AKEDA there - but not written from a user's perspective)
Now let's get real about dovetail jigs and their use. Unless you're a production shop and you're The Dovetail Guy, you're not going to use this thing day in and day out, weeks and weeks at a time. You're going to use it for the parts of your current project that need dovetail joinery - and then put the jig, its bits, guides and manual away - for a month, or maybe 6 months. The next time you get it out to use, I'm betting you won't remember all those things you had to learn the last time. I for one don't want to have to spend an hour or two re-reading a bunch of stuff in the manual. I don't want to have to go through a bunch of NOTE! and CAUTION! accompanied by a bunch of text and references to illustrations and diagrams. I just want to cut the damned dovetails for my project - cut 'em right without a lot of hassle - and get on with the rest of the project. Whiles whistles and bells and lots of moving parts are interesting - initially - they often over complicate actually using the whistles and bells enhanced tool.
The beauty of the AKEDA is it's simplicity - and here's some of that simplicity - three types of parts - illustrated below - at close to actual size. Note they're widths are ALL ONE INCH. That dictates a minimum centerline to centerline of tail sockets of One Inch - not some fraction, 15/16ths not 31/32nds or 33/33nds - ONE INCH - period.
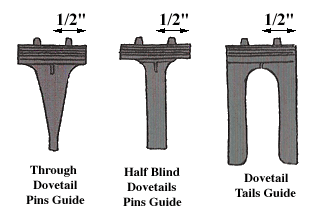
There are TWO TYPES OF PINS GUIDES - one for Half Blind Dovetail Pins and one for Dovetail Tails Guide that works for BOTH through and half blind dovetail tails.
Now if you want to limit yourself to one dovetail angle that'll work for stock from 1/4" to 1" thickness you'd need eight or nine of each of these parts and that's all you need. BUT - if you want nice narrow pin end showing on the front of your through dovetailed drawer, or the show sides of your cabinet or shelves, well just one dovetail angle ain't gonna do it. On thick stock the narrow end of the pins would be nice and narrow - though no narrower than the bit's shank diameter. But with that same bit and angle, the show end in narrower stock get wider and wider as the stock got thinner and thinner. That approach doesn't make sense to me. How about you?
There's a one type of Through Dovetail Pin Guide (one set of nine for each of the FIVE dovetail angles you can choose), one set of nine Half Blind Dovetail Pin Guides ( which work for all five dovetail angles) and one set of nine Dovetail Tails Guides ( which work for all five dovetail angles and for both through and half blind dovetails). They snap in place, no fine lines scales to try and read accurately to set them up. Put 'em where you want them, snap them in place and they stay there - no tools required.
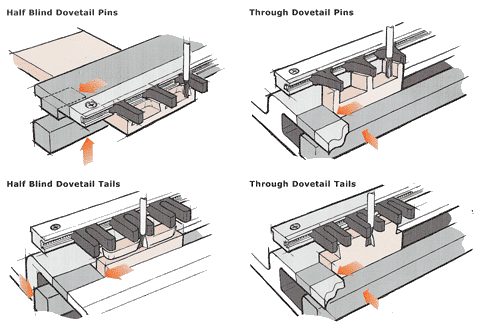
Here's the basics for half blind (half lap for the purists) and through dovetails. Note that the base of the router rides ABOVE the guides, NOT ON the guides. And the router is supported back AND front - above the guides - no chance for the guides to move, no chance for the router to tilt or rock - at all. Nothing to adjust (ok, so there's still the router bit's depth of cut - but that's a required set up for any router based system - regardless of what the advertisements and brochures say. We'll get to why they're bullshitting you about that later).
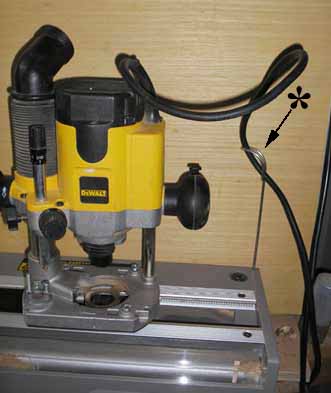
Just to give you an idea of how well thought out the design of this jig system is - it includes a neat little power cord clip thing that can slip into a hole on either end of the top of the jig. It's a minor thing - keeping the power cord out of the way of where you're routing - but the fact that it was even considered when developing the design - and that it made it to the production jig system tells me they really thought about the design of the jig.