This suspended walnut amphora is for a friend who is a wood phreak - and conveniently - a tree trimmer. He's not a woodworker - yet - but he appreciates trees - and the beauty often hidden inside them. When he learned that I turned wood, and saw some of the pieces I'd done, he offered to keep an eye out for stuff I might be able to do something with. I told him about cutting sections about 4" longer than their diameter - to allow for some waste due to cracking. A few days after offering to bring me some wood - he did - a pickup bed load of Atlas Cedar. A week later he dropped off another load - of black walnut - about 18"to 20" in diameter and mainly heartwood. He'd cut a piece right at ground level so one end had some wonderful root burl. THAT went to the best turner in our turning club who thought he might be able to get a few nice pieces out of it".
As a token of my appreciation I decided to do a suspended black walnut amphora for him. And here's how that went.
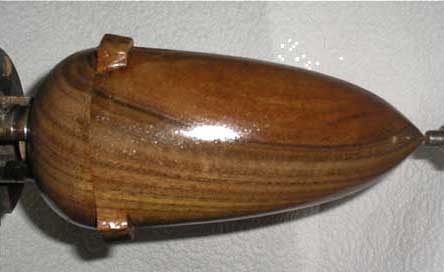
Here's the plan I came up with for the piece - basically a lidded box, with finial / pull - susended on three stainless steel legs. I enjoy making lidded boxes - with finials or pulls and a recent article in American Woodturner by Neil Scobie on Suspended Pieces inspired the "suspended part of the piece. My oldest daughter-in-law's kitchen has stainless steel "bar pulls" on the drawers and cabinet doors - and they seemed perfect for the legs of this piece (ideas can come from anywhere - if you let them ). I considered sneaking a few of her bar pulls but I was certain I'd get caught. So I made a run to Rocklers and BOUGHT two - a short one and one long enough to make two legs.
I know how to turn lidded boxes as well as finials and pulls. The extra "rim" for attaching the legs later introduced a "challenge" I'd not dealt with up to then. The turning was easy. The carving away what wasn't needed wasn't. Removing wood is not a problem - I have all sorts of chisels and files, flex shafts and burs, grinders and sanding disks. The trick was to NOT remove more wood than necessary - this was a Subtractive thing not an Additive thing. Putting wood back where it should not have been removed can be done - but it's a lot of work - and usually shows. Removing wood - on curved surfaces is even trickier than on flat work because you want to maintain the curved surface. And since there's a lid, you have to blend - acrossed where they join. Blending a lid to it's box is easy - just stuck them together and turn them together. Can't turn acrossed this thing's joint because of the three "fingers" needed for attaching the legs.
Fortunately, I have sharp bench chisels, several Foredom flex shaft hand pieces and burs, a Proxxon mini disk grinder/sander, a flat "micro-plane" file - and a lot of sandpaper in a range of grits. Doing the lid/box blending was time consuming - and a bit nerve racking. Slip and cut away too much wood - and it'd be Trouble In River City folks.
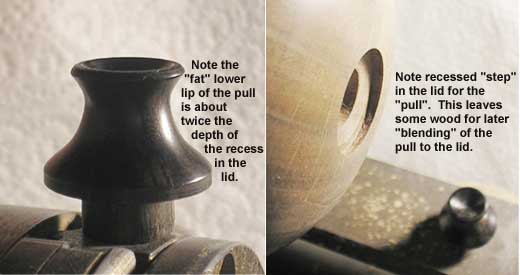
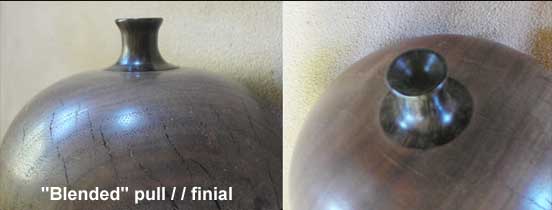
Another challenge for this piece is blending the lid and finial / pull. It's easy to turn a finial or pull and leave a tenon on it. A corresponding hole in the lid for that tenon to fit in is quick and easy to do - assuming you have a Jacob's Chuck that'll fit in your tail stock - and the right sized drill bit. But the results will look like a Stuck On - the pull obviously just stuck on the top of the lid. You can turn a bead on the bottom of the pull to intentionally break up the flow of things and try and continue the flow of curves above it on the pull - but it usually still looks like a Stuck On.
If you glue the pull to the lid, then turn it to blend into the lid - you end up with a knife edge on the pull - that is easily damage - even by sanding. The solution is to turn a recessed shallow hole in the lid, and leave some meat around the base of the pull where it joins the lid. Now the two parts can be turned together and blended - IF - the recess matches the diameter of the bottom of the pull - pretty precisely. This requires a lot of Turn The Recess - Test The Fit - Turn The Recess Some More - Test The Fit . . .
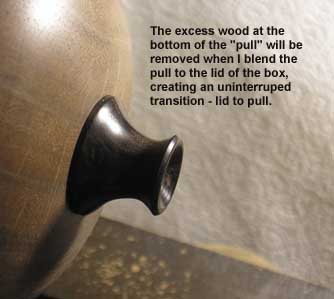
If you do it right, you get a nice transition from the curve of the top of the lid to the bottom of the pull - and no delicate knife edge to worry about. I still need to work on the cove of the pull - but this shows you the idea of blending.
This piece has three more challenges to overcome
- drilling the holes for the legs to fit in
- cutting the bar pulls to get three equal length legs
- cleaning up the wood around where the legs join the "body" and blend them into the rim
This jig I made to hold pieces for laser engraving is going to make drilling the holes for the leg attachment easier
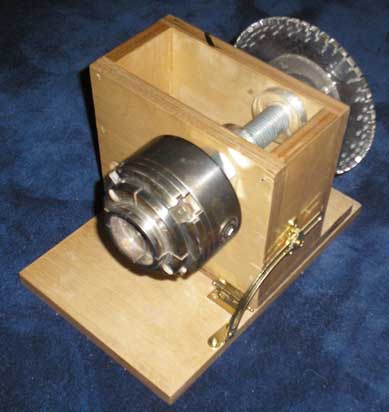
This jig will make cutting the bar pulls to the same length. Now all I need is a rebar cut off saw . . .
more to come