Turning delicate and turning small provided plenty of practice using a curved edge skew and a regular old single bevel bench chisel to cut balls and beads and coves and grooves. Because I was starting with what would otherwise be scraps, and the diameters started out relatively small, there was no concern about a catch or dig in that could cause heart failure or loss of life or limb. As a result, I tried all kinds of ways to make a particular type of cut, and some cuts for which I had no particular application in mind -because the risk of failure was so low and the consequences basically nil.
Looking back on all the Slicing & Dicing I decided to put together some illustrations of the basic cuts I used for all the spinarettes and the little peg things. Once you understand what cut does what and how to make them they can be combined and improvised on to do all sorts of things.
So here's the first one - a simple Rocking Slice Cut Acrossed the Grain Cut. This cut is great for cutting line grooves and making "stop cuts" into which other subsequent cuts can be made.

The next basic cut - the Peeling/Shearing Cut - is great for reducing the diameter of your turning - either along its entire length or in just one area. It does require a square chisel end, a bedan, plane old single bevel bench chisel or even a parting tool work just fine. The only tricky part, which is the trick for all this type of cut, is keeping the cut tangent to the changing diameter of the piece - preferably ABOVE the horizontal centerline of the piece. That means that you have to getnly dive the tip of the tool downward as the diameter is reduced. If you keep the bevel behind the cutting edge rubbing the wood it will burnish it o a nice smooth surface

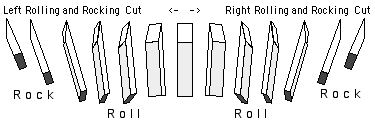
Now if you make a Rocking Slice Cut first then use these two basic cuts and add a Roll between the Peeling Shearing Cut and the Rocking Slice Cut, cutting towards the "stop cut." you initially made you can turn a bead, or a ball. Here's your view of this Roll and Rock Cut. Though the illustration shows the cut being made "bevel up", it can be made "bevel down", though the cut would then end with the back of the chisel parallel to the vertical wall of the stop cut.

Here's an end view of the cut which shows how it transitions from a peeling cut to a cross grain cut . Note how the chisel is rocked down into the cut as the rolling cut is made. Also note that the actual cutting section of the edge remains ABOVE the turning's horizontal center line. Cut below that centerline and you're apt to start an uncontrollable Spiral Cut or cause a Dig In with the upper corners of the chisel.

This Roll and Rock Cut can be made either Left or Right, bevel up or bevel down. The rate of roll will determine whether you cut a squished almost flat ball, an oval sqeezed ball or a nice round ball. Roll fast for the squished almost flat ball. Roll slow for an oval squeezed ball. Roll in between to get a round ball. Play with the Rolling and Rocking Cut to
