OK - we know where we want to go. HOW do we get there?
Let's start with what we're playing with and what connects to what. Working that out usually starts with BreadBoarding - hooking things up temporarily - to test how they work - before committing to soldering parts to wires and wires to the micro computer's board.
Fortunate for Arduino micro-controller users, there's a FREE software package called FRITZ you can download and use - to put together illustrations of how you hook components up and connect them to specific "pins" on the micro computer. You can download FRITZ by clicking here and downloading the version for your operating system (Windows, Mac or flavors of Linux).
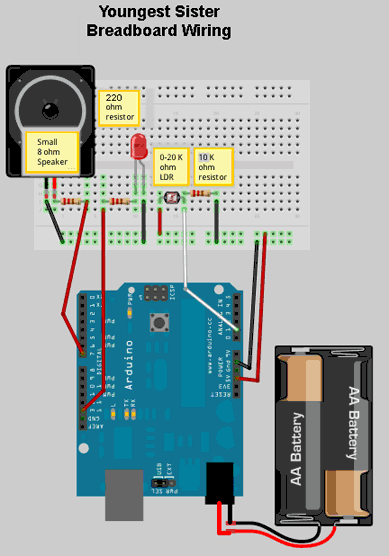
Here's the FRITZ created "breadboard" version of The Youngest Sister. If you plug the components into the breadboard as shown - and make connections with "jumper wires" - as shown - then download a "sketch" to the micro controller - you can identify to the Sketch - which pins on the controller are to get signals - from what - and which pins on the controller are to send signals to stuff. All the numbered pins on the micro controller can be configured as either INPUT or OUTPUT - and 14 of the 20 pins (0 to 13) can also be configured as "digital" ie - ON/HIGH or OFF/LOW. The six Analog Pins (a0 to a5) can "read" or "write" 1024 different values
Once you've got the components plugged into the breadboard and jumper wired to their pins on the micro controller - you can hook up your computer to the micro controller one of two ways. The Arduino shown in the illustration above has a USB connector to the left of the power plug. Plug a one end of a USB cable into your computer or keyboard, plug the other end into the mcro controller. Download the software to the micro-controller - and find out if it works - the way you thought it would - or the way you want it to work. Breadboarding makes it easy to move components and connections around.
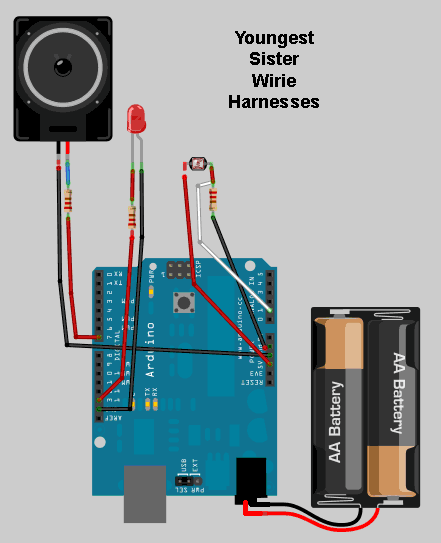
When the breadboarded version is working it's time to get things connected with more organized cables. 2-wire and 4- wire phone cords are easy to come by and work well for "hide everything inside something" applications. Having a "wire harnesses" illustration of your set up helps. So make a FRITZ wire harnesses illustration - like this one. If you use WHITE phone cables - you can write what the harnesses is for on it with a Sharpe pen. You can add which pin number key wires go to as well. THAT will come in handy when the component on one endof a cable is inside something - and out of sight.
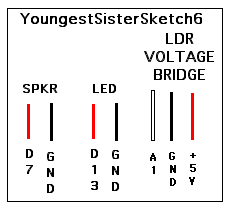
Here's another helpful type diagram you probably should put together - to help you with "which wire connects to which micro controller pin" because you'll be hooking things up and taking them apart - over and over again - on your first project. IF you've used "cables" with a light colored insulation sheath - you can Sharpe pen the component name (or a recognizable abbreviation) and wire color to micro controller pin. For the speaker in this example the penned on wire label might look like SPKR R-D7, BLK-GND (SPeaKeR component, Red wire to Digital pin #7. BLacK wire to a GrouND pin). When everything's checked out, works and final "assembly" is done - slip this diagram in the piece - for future reference. YOU will eventually have to change the battery - and if a wire slips out somewhere - you're NEVER going to remember where it should go back to - months or a year later.
PUT THE PROGRAM NAME ON THIS LITTLE DIAGRAM SO YOU CAN FIND IT AGAIN LATER IF NEED BE.
PUT A COPY OF THIS DIAGRAM INSIDE THE PIECE FOR FUTURE REFERENCE.
All I needed now was a program to use these components. A little web search for Arduino turorials turned up a program to use an LDR based Voltage Bridge to control tones for a speaker based on output from the voltage bridge. Also found a tutorial on how to blink an LED. Put things together on a breadboard, hooked them up to the Arduino, loaded up the programs - and they worked - individually. It was when I combined them - that things didn't work. They worked - but not the way they did independently. I had a Timing Issue. To blink a light - the LED - you have to tell it to turn on for a specific amount of time and then turn off for a specific amount of time. And to make the speaker put out a tone - at a specific frequency - you have to turn it on for a specific amount of time and turn it off for a specific amount of time. The program language "C" (and "C++") have a function called "delay()" - that works in units which are 1/1000 of a second - or so. If an LED stays on a little longer or a little shorter than you wanted - no big deal - you probably won't notice anything. BUT - with sound, staying on a little longer than you want AND off a little longer than you want - can result in a very different sound PITCH. A pleasant sound created from just the LDR Voltage Bridge and a speaker - can become an annoying sound when its timing gets thrown off by time being spend turning the LED on and off.
A bit of head scratching - and a bit of cussing and swearing got me nowhere. This Delays Interference Problem had to have been solved - by someone. Thanks to the internet - I found someone had come up against this problem - and came up with a way around it. And again, thanks to the internet - the solution was shared - with anyone who needed it - and could find it. And thanks to one of the forums on Arduinos - I was able to find it. A quick download, some cutting and pasting and I started debugging the resulting "sketch" (program). In under an hour I had a "sketch" that would blink and LED on and off the way I wanted it to do AND one that would sense changes in light levels falling on an LDR "sensor" - and create the sounds I was after.
So here's the resulting YoungestSisterSketch6 you can download and try. I've tried to include comments to help understand what it's doing. If you have questions about it e-mail them to me and I'll try and answer them.
To see and HEAR this piece in action CLICK HERE