A ping pong ball was fine for working out a way to get a servo to move an eyeball. But a ping pong ball is a bit too large for the piece I have in mind. I needed to find something smaller for this piece's eyeball.
If you're looking for suitable eyeballs, the end of September is a perfect time. With Halloween coming up eyeballs were VERY easy to come by - they're ubiquitous - at the check out counter of practically every store. In this case, the need for a smaller eyeball came at the end of September. Coincidence?
I've found that when you're doing something you seem to supposed to be doing, things happen to help you along, often just when you need them. This one is just one more confirmation of this probably naive belief,
A little sanding to remove a seam in the littler eyeball, a bit of sawing to remove the back third of the sphere, two holes drilled for the axis about which the eyeball will pivot, two more small holes to attach the arms which connect the eyeball to the servo's arm, some white high gloss spray paint, some pupil coloring with Prisma Color and black Sharpe felt tip pens - and five coats of clear high gloss finish and I've got - an interesting eyeballl. - or two.
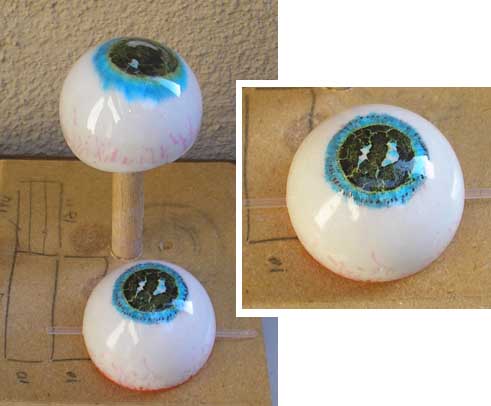
So far, so good.
On to turning the capsule.
I've got a small lathe - a JET VS Mini. It has a nominal swing of 10 inches. But, unless you want to keep mounting and unmounting the piece so you can move the tool rest's banjo, the usable swing is closer to 7 1/2". So far, I've seldom turned anything large than a bit over 5" in diameter. And because I like turning lidded boxes, I need DRY wood - which is hard to come by in sizes much larger than 5 or 6 inches.
But, as luck would have it, I HAD some - from a died and dried standing tree - that happened to be up against a building at a shelter for very troubled teens - one of whom is one of my pseudo adoptees. I'd been driving her to and from school while she was at the shelter and I happened to be there when this several years dead birch tree was being taken down. The already cut pieces looked interesting, so I asked the crew if I could have some, explaining that I was a wood turner. They were happy to oblige and cut up some pieces of the trunk where and how I wanted them. I gave them a twenty as a token of my appreciation - and they encouraged me to take more wood - which I declined to do - being in a little Mazda Miata convertible.
This unusual "dried standing" wood showed eveidence of spalting, confirmed when the pieces were roughed to round - tediously - as the wood tore out regardless of how sharp the gouge - and had punky areas that would require a LOT of CA glue to barely stabilize enough to turn. But this was the only wood available of the size I needed for my capsule.
Again, it may be coincidence, but this less than ideal wood came from a shelter for kids, some of whom already had a methamphetamine problem - or were the children of at least one Speed Freak parent. This piece was about Speed - and the havoc it wreaks on users as well as anyone who cares about them. - so it seems as though it was destined for this piece - or at least one piece of it was.
(See what I mean about how things work when you're doing what you're supposed to be doing?)
This capsule shaped lidded box presented two "challenges" - first the wood and second the shape.
Even idded boxes that have straight sides at the lid to box joint are not all that easy to do and get a good fit and continuous flow of the wood's grain. You get the box and lid - still joined in the blank - close to the final shape, turn where the overlap is needed, cut the two pieces apart, tune the fit before doing the hollowing.
With this shape, things have to be done out of order - turn where the overlap will be - hollow just enough to get the fit of the lid to box joint right, then turn the outside shape. And this piece of wood fought me all the way, much like my out of control pseudo-adoptee did. 778 As you can see, tear out was part of the reason, and punky areas required considerable CA glue - which discolored the faces of the joint as well as the area near the top which is the darker area in the picture below. I had to resort to my "60 Grit Gouge" for the outside's final shaping, the wood tearing out too badly even with a very sharp skew or gouge. I've got a bit of hand sanding to do - before I paint the outside matt white and the inside matt black. I've got a final finish idea that will take care of any scratches I miss.

So far - so good.
Next up - making the fixture for the eyball / servo unit. More to come.