When you think of designing on a computer, you normally think of drawing programs, probably a mechanical drawing program aka a CAD program or a "paint" program.
When you take pictures of the piece you designed and have turned, you'll likely use an image manipulation program to work on your photo - to adjust the lighting or color balance, then to crop the photo to make the piece the focus of the image..
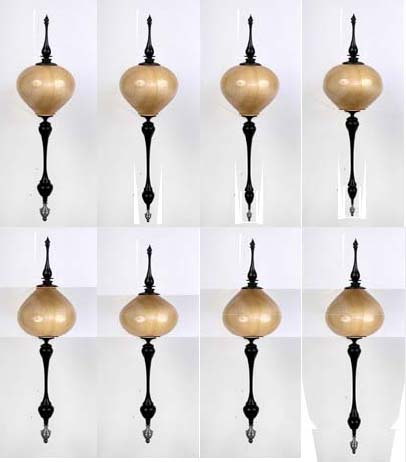
But - WHAT IF - you start the design process with a photo of a piece you did - and wanted to play with variations of that piece - and SEE the variations in photo quality images - with the color and grain of the actual wood used - AS YOU'RE MAKING THE CHANGES?
WHAT IF - you could do THIS?
WHAT IF - you could do this - in half an hour or so? And - WHAT IF - you could do this with a graphics program that's under $100 - or FREE?
You're probably thinking "Oh great, another LEARNING CURVE to have to scale. This looks interesting - but I'm going to pass.".
Before you give up - you might want to read on. What follows is a Basic Tutorial that should flatten that Learning Curve considerably and give you a new and powerful design tool.
Interested?
The PhotoShop As A Design Tool Basic Tutorial uses PhotoShop 5.5 (last Update 1999) and Elements 6.0 (2008), but the tools and concepts are in other programs - like GIMP, a free, open source program, and Paint Shop Pro - and their icons and use should be similar.
Want to get a feel for how easy it is to do the type of thing you see in the above variations? CLICK HERE ---->