After a half dozen or so of each, I've got two intersecting arcs - with and without a quarter turn twist - down, both conceptually and turningly.
turningly: the ability to see a turned object and KNOW how, with the turning tools one has,
.................and with one's knowledge, skills and abilities with said tools, to turn said object.
The logical next step was to turn an object that had THREE intersecting arcs.
Maybe it's because I was raised Imperial - ie miles, yards, feet, inches and then Halves - half of one = 1/2, half of one half = 1/4, half of one quarter = 1/8, half of an eigth = 1/16 - I think of dividing things into even numbers. I can divide a square or circle in half - by eye. And maybe because I live in a "square and plumb" house and do "flat work" that is made up of square corners with an occassional quarter round edge, I can SEE a square corner or a half or quarter circle. Give me a square turning blank and I can find its center - where the diagonals intersect. And once I've got its center I can bisect its sides. I can even eyeball 22.5 degrees fairly close.
I'm pretty good with "halving" - not so good with "thirding".
So - the first "challenge" of 3 Intersecting Arcs is divying up a circle into THREE equal parts. No big deal - right? 360 / 3 = 120. So the intersecting lines on which the centers of the three arcs must fall are 120 degrees relative to each other. Simple - right? Actually, it's not so simple.
Have you ever tried cutting up a round pie or cake or cupcake into three identical slices - for three kids - preferably siblings? Be off by a mere degree or two and the border issues between the Palestinians and the Israelis look trivial by comparison. Similar consequences for your three sided turning - be off just a bit and it'll be noticable in the finished piece.
"Why not just use a protractor to get the angles?" you reasonably ask.
Well, if you're working with a 3/4" x 3/4" square blank, and the protractor has a three or four inch radius . . . See the problem?
Here's one solution. Got this thing for checking the bevel angle - on roughing gouges, spindle gouges and bowl gouges - the ones other angle checking thing-ama-jigs have trouble with. Picked it up at a woodworking show - from Peach Tree I think. Price tag on the plastic case says $14.95. This is a Chinese knock off of Starrett's $75 version.
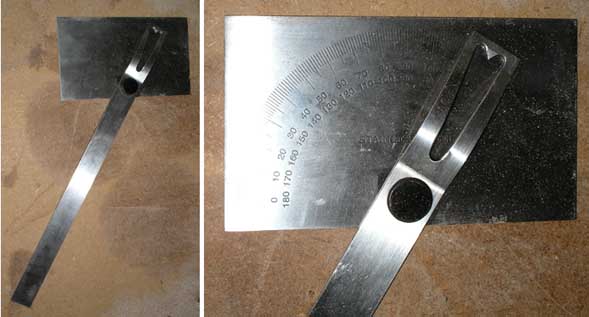
Now you've got a way to draw three lines which are 120 degrees to each other. Problem solved.
Only two more "challenges" to go . . .
"What!? TWO - MORE?! I thought we were done. You mean there are two more problems to solve before we can start turning?"
Yup. TWO more challenges to go (and just to make things interesting - they're interactive).
First challenge - where, on your square blank, do you put the center of your three 120 degrees apart lines?
"Put them centered on the square blank - of course." you say?
Well, you COULD do that. But you wouldn't get the largest three turned arcs object that way - and you'd waste some wood.
Second challenge - how big a radius should the arcs have? You do want to get the largest "triangle" out of your blank right? But - you also want the arcs to intersect - inside your square blank - right? It's an Optimization Thing.
So you break out a good old No. 2 pencil, some graph paper, plastic square, find your compass and protractor, and draw a 1 1/2" x 1 1/2" square. You draw the diagonals to find the square's center. Then, using your square, draw vertical and horizontal lines through the center of the square.
For convenience sake you use the square's vertical line, which passes through the square's center, to place one of your THREE "120 degrees apart" lines. A little protractoring and you've got your three "120 degrees apart" lines - their intersection point at the center of the square blank.
Now you're ready to begin The Trial And Error Process.
(If you don't want to slog through the word description of what comes next, skip down to the illustration below)
Pick a radius - any radius between 1 1/2" and 3/4"- with its center on the vertical line of your "120 degrees apart" lines.
Draw your first arc so that it's tangent to the bottom of the square.
Since you want Three Equal Sides to your three sided object, the centers of ALL THREE arcs must be the same distance from the intersection point of the three "120 degrees apart" lines. So draw a circle who's center is at that point, the other end at the center of your first arc. The center of each of the two remaining arcs must fall on this circle - and on it's "120 degrees apart" line.
"I want to maximize the use of my square blank - so I'll start with an arc who's radius is the same as the sides of the square blank." you tell yourself. So you try that. Two problems with that idea. First - the arcs don't intersect INSIDE THE SQUARE. Second - you're going to want to mount your blank between centers and you can't do that on the edges of your blank.
More trial and error work and it quickly becomes apparent that the radius of your arc, and where you put it's center, determine if your three arcs intersect within your square blank. If you're lucky, you'll find the right combination - in less than an hour - or before you run out of erasers. You'll get there quicker with if you use CAD.
Not as simple and straightforeward as you initially thought - is it?
You'd think that you'd want the centerlines of the three arcs you need to intersect at the center of the square blank. Well you COULD do that. BUT - as you can see from the illustrations above, if you want to maximize the use of your square blank, you need to offset the intersection of the arcs from the center of the square blank..
"Oh goody! More Trial And Error stuff!" you're no doubt saying - out loud (perhaps accompanied by some cussing and swearing). Hang in there - it'll be worth it.
Well here's what you're looking for - just to give you a starting point to cut down on your number of trials.

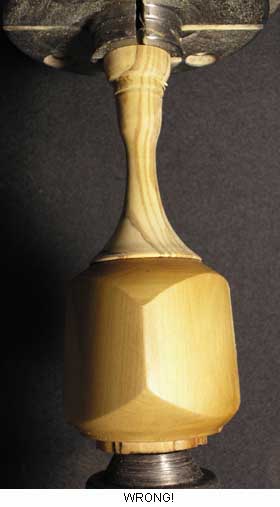
And here's a Three Arcs Box - sans a lid - and some finishing. It's out of apricot and shown scaled down just a bit. Note that in the Top View, the opening IS NOT CENTERED on the "triangle". Didn't catch the "offset" thing 'til AFTER I drilled the hole and had hollowed out the box. I hope you learn from my mistake(s).

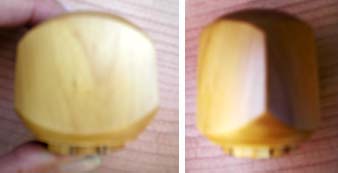
This piece would look kind of boring if I'd kept the top and bottom"flat" so I rounded them a bit. As a result, the piece looks very different as you rotate it.. Getting the "edges" to come out straight and equidistant was not trivial since they're determined by the intersection of two arcs, on different centers. I penciled guide lines on the round blank and snuck up iteratively, turning off "half the difference" until the arcs intersected on the line.
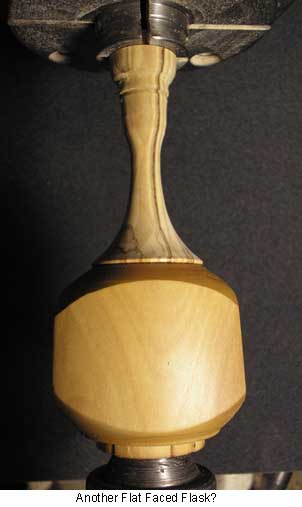
Working out a top for this piece. Here's the one I'm working on now - in olive. I know I want to carry the curve on the top of the box up onto the finial with a sweeping semi-continuos curve. Have to neck it down more but so far so good. How I'll top it off isn't clear at the moment - but it'll come to me when I get there.
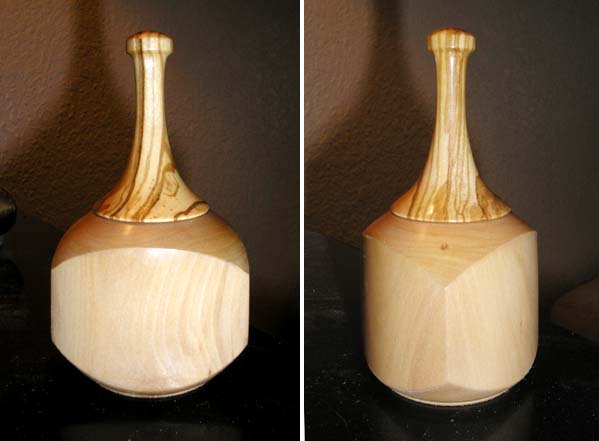
Here's the tentatively finished piece with a coat of HUT wax on it. Am thinking a more contrasting wood would look better - maybe with no noticable grain since the apricot has little if any noticable grain.. And it should be a little more delicate than this olive top, but keep that sweeping curve, contiunuing the curve on the top of the "box".
I really like the visual ambiguity of this three sided box. If you didn't look closely, you might think these are two different boxs.
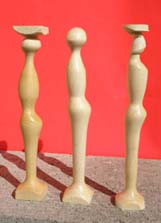
Am working on a mathematical method of calcualting the arc radius and center location - but it's going to be a while. I'm now playing with a stylized "human forms" - done with three centers. Here are, from left to right, my first three attempts. Attempt #3 was so close - except for the top half being off by 180 degrees. this multi-axis turning thing is kind of tricky since outcomes are not obvious as you change centers and strart to turn. Sure wish lathes came with an UNDO feature.
Worked out the math (some trig, some algebra, some geometry, ...) and came up with the equations for getting the biggest 3 equal radius intersecting arcs out of a square blank. Here's a quick reference table, the equations so you can calculate "r", R and "d" for any square with sides S, along with a diagram of What's What.

If you want to see how these equations were derived - CLICK HERE.