Making of Maasai 1, 2, 3. . . & 4
Playing with Multiple Axes Turning

Genesis of an Idea
These pieces were the inspiration for a series of multiple axes turnings - Maasai
The pieces reminded me of of the bright colorful print fabric often worn by the people of Ghana and Ivory Coast. This is a PhotoShopped composite with some tweeking of the look of what I was after - initially
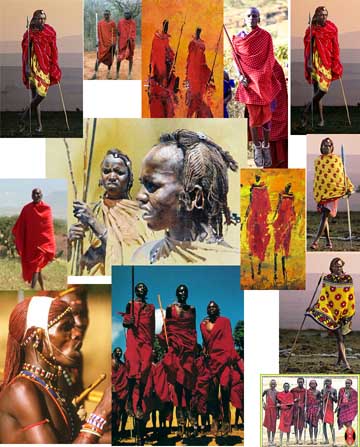
My mind then jumped to an iconic image of Africa - a Maasai Warrior - in his red shuka - the red color being for warrior / blood/ bravery.
Thanks to Barbara Dill's articles on Multiple Axes Turning (MAT), I'd been playing with ideas to apply the MAT concepts she's found - to designing and sculpting pieces - on a lathe.
So, the idea - a Maasai Warrior turned on multiple axes.
BUT - it would take a bit of planning.
Developing the Idea
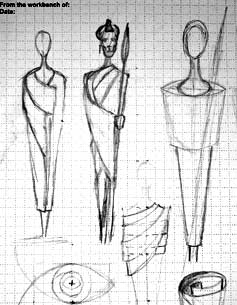
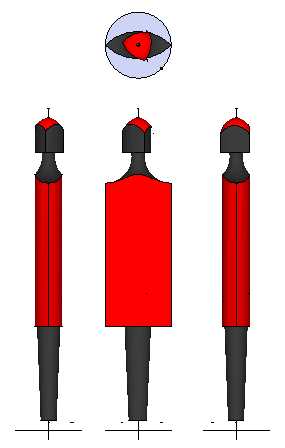
Started with some pencil sketches to get a feel for the look I was after and from there I began to work out the the basics of the cross sections to turn to make the piece. The "torso / robe" would be lens shaped, two intersecting arcs turned on two axes. The neck and legs would be turned to tapering round cross sections on a the center axis of the blank - the head either on that same axis - or turned on three axes to create a more triangular cross section.
The nice thing about multiple axes turning is that you're not constrained to single axis symetry and only one profile. You CAN have symetry on each set of axes, but you can change the line of symetry many times in a single piece - or you can go asymetric on one set of axes - or on each set of axes. Escape from thinking ROUND and what you CAN turn becomes wide open.
Refining the Idea
From the sketches I then went to Google's free 3D modeling program SketchUp to start working out where the centers for the needed axes should go and where the centers on the ends of a blank would go. Here's the Top View, Left Side View, Front View and Right Side View of the resulting SketchUp model.
Note that the triangular "head" is turned to the left a little, something you CAN do using multiple axes - that you CAN'T do on a single axis turning - add nuances - a turned head, a lowered chin, a robe twisting a liitle around the body inside. Mutliple Axes Turning allows directionality - orientation - of parts of turned pieces
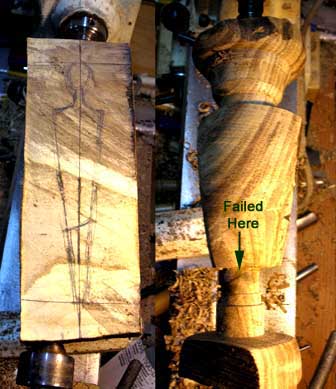
First Attempt - with the Wrong Wood
With the centers locations worked out it was off to the lathe. Had some recently cut Mimosa on hand so I started with it - and added a quarter TWIST to the "torso / robe". While green wood is easier to turn than dry wood, green wood isn't usually as strong as dry wood. THAT became an issue while turning - when the green wood failed.
If you look at the following illustration - at Figure 3 specifically - you'll see that when turning the torso you're turning way off center and each cut exerts the most torque on the blank. If you get a catch the torque on the piece goes up suddenly - and the narrowest part of the blank is the weakest part of the piece - the weak link in the chain - the legs at the ankle can, and probably will, snap off. This will pose a "challenge" doing the iterative turning to refine the proportions of the piece tricky.
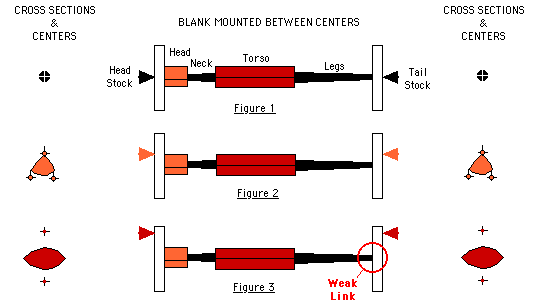
When the wood failed, it was mounted as shown in Figure 3, above. I was turning on one of the two Torso axis - and had a catch. The resulting torque twisted the "leg" - and the wood in the leg sheared off. This Weak Link would impose a physical constraint on the execution of the piece that I'll get into later.
Attempt #2 - With Better Wood
Wet wood, though more easily turned than dry wood, has several inherent shortcomings. First, it's weaker than dry wood. When turning on multiple axes, both torque and shear forces are exerted on the wood, as well as the normal compression forces from squeezing the wood between the head stock and the tail stock. Starting with wet wood turned out to NOT be a good idea.o
Dry wood, in addition to being stronger than wet wood, also cuts cleaner and crisper and is more easily sanded - wet wood tending to gum up sandpaper.
Unlike single axis turning - to full round cross sections - with only a smooth single outside surface and a symetric about the center axis profile - multiple axes turning can have non-round cross sections with "sides / faces" and "edges" where they intersect. And the "edges" where the "faces" intersect don't have to be straight - they can twist - or even reverse the direction of the twist as you go down the side of the piece.
To get clean crisp "edges" you need DRY, TIGHT GRAINED WOOD.
SO - for Attempt #2, I went with pearwood - dry, hard, very close grain - and light in color (the piece will be painted).
Started with the "torso" since its two axis are farthest off center and I need plenty of surrounding wood for strength. Even with a realtively small blank ( 1 1/2" square and about 12" long), I had to add a 25 pound bag of birdshot to my lathe bench to keep it from walking around the shop.
After I'd turned the two intersecting arcs for the torso, I turned, on the blank's center axis, a little of the bottom of the neck and the top of the legs - again while I had plenty of wood on either side. I want an abrupt squared off effect where the torso meets the neck and top of the legs.
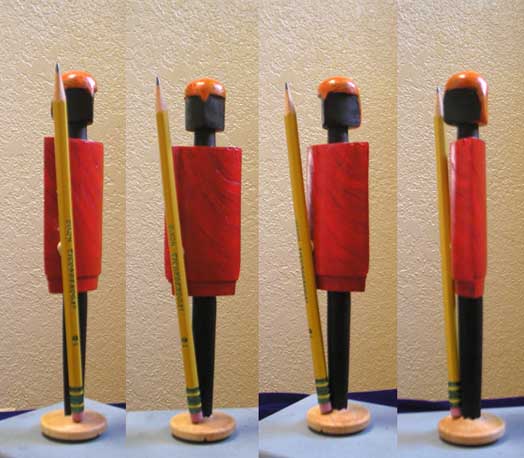
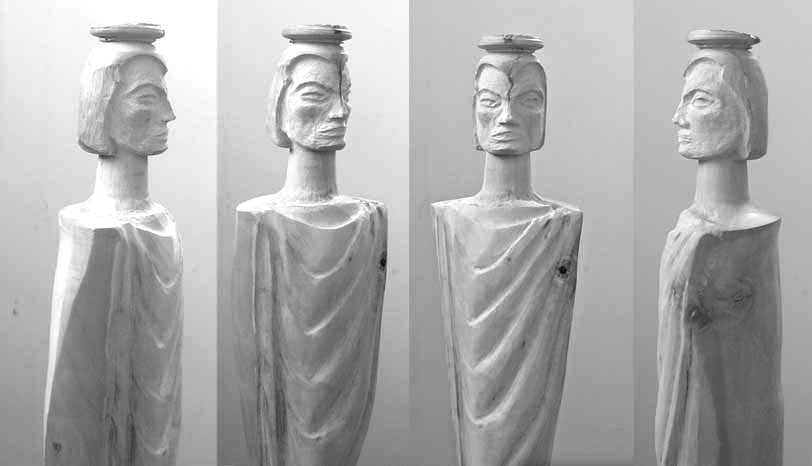
This first successful attempt looks like a figure made of LEGOS, not at all the look I was after.
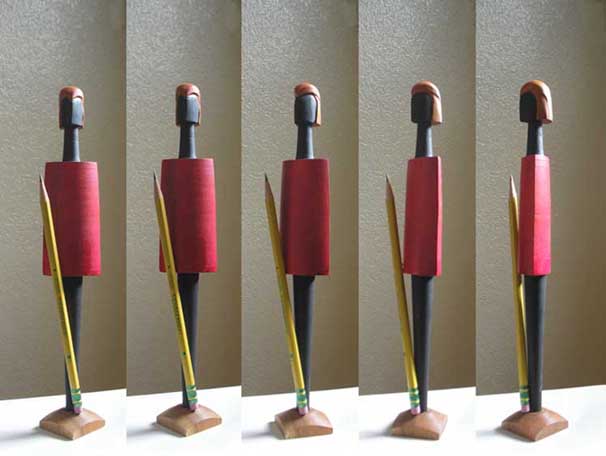
A No. 2 pencil happened to be on my lathe bench and when I held it up to the piece while it was still on the lathe "The Pencil is Mightier than the Spear" popped into my head. A No. 2 pencil would be the spear.
Attempt #3 - Again with Pearwood
This time I went with a longer blank so I could have some room to adjust the height of the piece if the proportions need changing.
Turned the two intersecting arcs FIRST - while I still had plenty of wood for strength. When you're turning way off center, you need all the strength you can get - especially when you're turning at 1600 to 1800 rpms.. Turning off center at low rpms means more time in Air Wood and, initially, only occassionally in Real Wood. Crank up the speed and you get cleaner cuts and a lot less tool bounce.
Once the two intersecting arcs - with a little twist - were turned, I turned a bit of the neck and legs to give me some separation between the torso and the triangular head and the torso and the legs. By returning to the blank's actual center axis and turning some of the neck and legs, I could get a clean crisp cut at the shoulders and the legs. But I couldn't turn the neck and legs to final profile because I needed them thick for strength.
The turning process was iterative - sneaking up on the final piece
- turn the two arces torso
- turn a little of the neck and legs
- turn the three arcs head
- remove the piece, stand it upright and check the proportions
NOTE: proportions that may look right while mounted on the lathe may not look right when the piece is vertical
- adjust, starting with the the two arcs torso
The risk with this piece is the thin neck and long thin legs. The longer the tapered legs get the thinner they must be at the ankles. A chain is only as strong as its weakest link - and the ankles diameter is the weakest link.. Too thin and the next iteration of refining the proportions - turning on the torso - can shear the piece off at the ankles. I erred on the side of caution - and it turned out I didn't get the proportions quite right. They legs were too short, in part because I was too cautious and in part because I ran out of room on the blank.
Side Tracked (and a few carving tips)
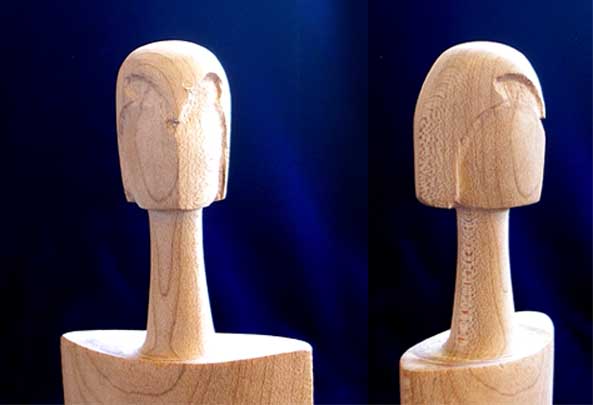
And then I went off track - and got into carving - starting with the face. If you get the face wrong any other carving you do will be a waste of time.
The face carving was done with four sizes of small dental ball burs and a Foredom flex shaft handpiece using high rpms and a lot of light cuts. Carving is a subtractive process so it's best to Sneak Up On It so you don't OVERSHOOT. This way, if you DO make a mistake it'll be a small one, and a lot easier to recover from than if you are more aggressive with your carving.
Tip #1
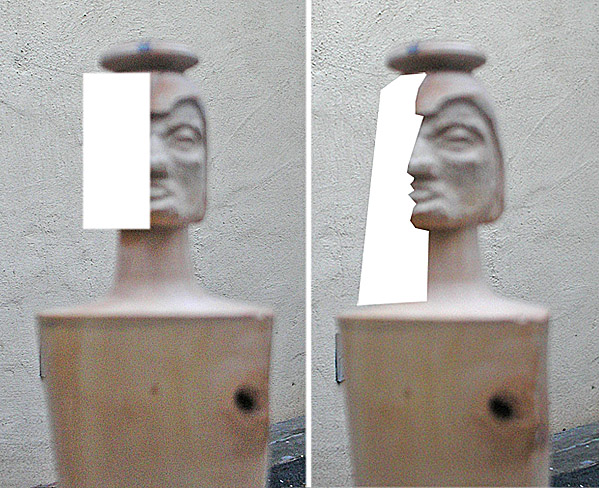
Start carving just one side of the face. Rough in the eye socket, cheek bones, cheek and jawline - and half the nose. Then take some digital photos and, in an image processor, look at whhere you're at - blown up so you can see things better. White out the uncarved side and see what needs to be refined.
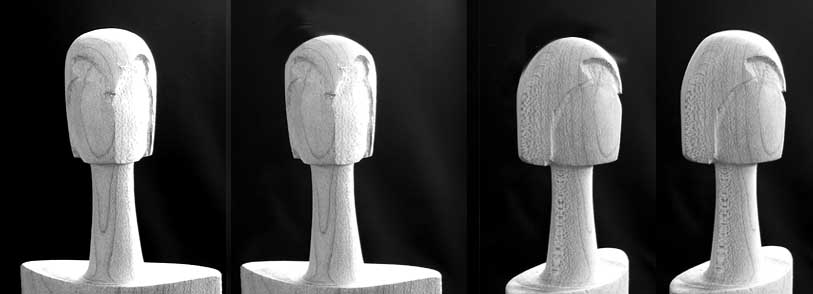
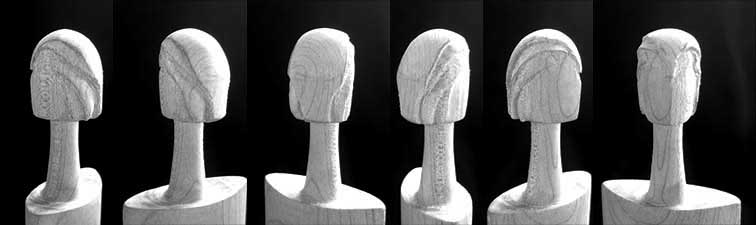
Carving Phase 1 - Roughing in the Face and Hariline
Carving Phase 2 - Refining the Face
Tip #2
Convert the image to Gray Scale to eliminate color distractions. Use the CLONE tool, the BLUR tool and the SMUDGE tool to modify the image to what you think it SHOULD look like. Do your modifications on separate layers so you can turn them off to see where you are and turn them on to see where you WANT to go. When you have something that looks right, print it and have it on hand to check with as you start carving again.
The two left images are the actual piece. The right image shows needed changes - done in PhotoShop.
With a print of where I wanted to go, it was back to carving with the flex shaft.
Carving Phase 3 - Face, Hariline and Beginning Robe Folds
Changed the hairline to make it look less like a helmet, worked
on refining the face and began carving the folds in the robe
Carving Phase 4 - More on the face and on the folds in the robe.
Changed the jaw line and nose then worked on the folds in the robe using a Proxxon small angle grinding with sanding disks to rough them in
Carving 5
The face was too wide so I began narrowing it and changing the jaw line. The chin was too wide so I'm narowing it as well. The lips still need to be worked on.
The folds in the robe were too symetric, falling on a single vertical line, so I began breaking up that symetry some and working on its folds at the shoulders.
Add Color
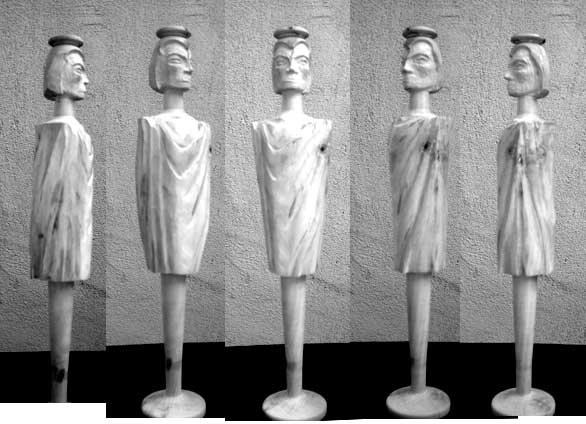
Applied the color (Golden's Fluid Acrylic for the hair and robe, Golden's Black Gesso for the skin) The legs still look too short.
The carving is OK, but the legs are way too short - even without my intent to emphasize Tall and Thin look of the original idea.
Attempt #4 - Version 2 of the Original Idea
The original idea for the piece was a multiple axes, minimalist, stylized piece that would evoke associations of a Maasai Warrior / Herdsman - and maybe even of Africa, the piece, the seed for the imagination to play with, the viewer filling in what ISN'T there, based on their own knowledge and experiences. Color will also be used to trigger associations in the viewer's mind - the distinct red of the robe, the orange/ochre for the orange clay Maasai moran use in their hair, flat black for the skin color, perhaps with dark blue to hint at contours that are not actually present in the piece.
On an 1 1/2" square by 14" long piece of dry maple - at the length capacity of my JET Mini VS -I laid out the centers I needed on both ends then penciled in the basics of the figure. Next I penciled in my control points along the length of my blank, leaving room top and bottom for adjustments later, if needed.
- top of head to top of neck
- top of neck to top of shoulders
- top of shoulders to bottom of robe
- bottom of robe to bottom of legs
Turning the piece was an iterative process - turn, take off the lathe & stand upright, see where changes need to be made, remount and turn some more. This was done five or six times before I got a look I liked. But every time it came to lengthening the legs it meant tapering from the robe to the ankle - and the diameter at the ankle kept getting smaller and smaller. That meant that the next thinning of the torso could snap the ankle if I got even a little catch.

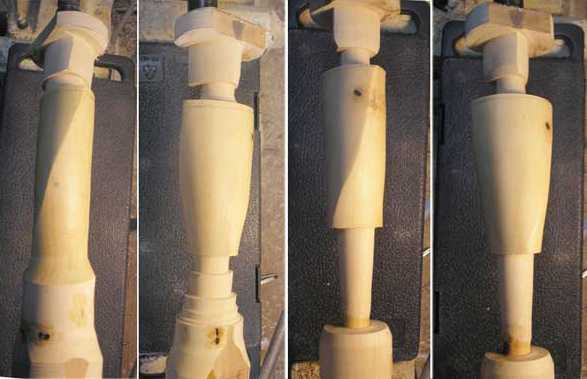
These high angle shots show the different cross sections used
- triangular for the head to get a face with a front, sides and back
- round tapered neck and legs
- tapering "lens shape" cross section for the robe
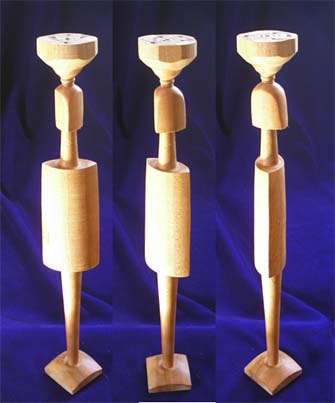
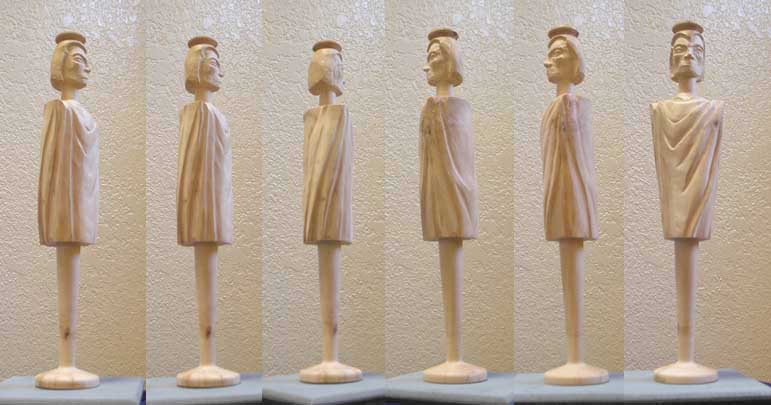
Parted off and painted, the look is much closer to the original idea. The legs are STILL too short, the head and torso too wide. The Elvis pompedour hair needs some major changes and the No. 2 pencil is too short by almost half. Looks like I'm going to have to make my own No. 2 pencil for this one.
Attempt #5 - with a longer maple blank
This tiime I started with a LONGER blank - about 14" long (toleavepent of room for adjustmnets if needed), and again went with maple -a 1 3/4" square.
Here are the centers used -color coded and with blank's size.
The RED centers for the torso are off set from the blank's center by about 5.8"
c
I turned close to what looked about right - removedthe piece from the lathe and stood it upright to check the proportions. This On & Off the Lathe process was repeated four or five times. I've found that taking photos of the piece from different angles and then looking at them in PhotoShop helped me see things that needed changing easier. And I could modify the images to show what looked better. Then I could print the modified image and take it back to the lathe for the next pass at turning changes.
The turning process was iterative - turn to what seems OK - check - identify needed changes - turn adjustments. As the adjustments were turned things got trickier since the tapered legs kept getting thinner, and weaker. The "ankles'" diameter became THE weak link, ending up 3/16" in diameter. With a blank that's about 14" long, being turned between centers - and for the torso, turning 5/8" off the blank's center - I was skirting with disaster. Too much pressure from the tails stock and the "ankle" could break. Get a catch - and the "ankle" could be twisted off. Did a LOT of very light cuts while sneaking up on the torso's final cross section.
Here are some shots of three of the four or five iterations of turning.

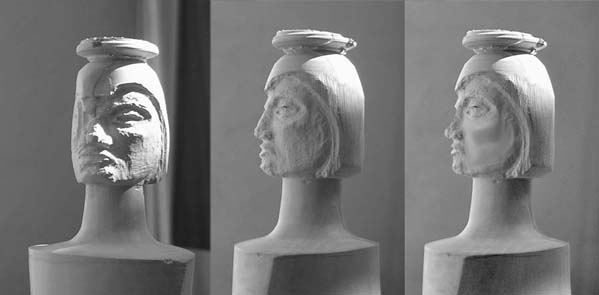
With the piece parted off I started on the hairline / forehead carving. Penciled in the hairline and, with a small dental ball bur in a Foredom flex shaft handpiece, cut in the hairline lightly. When it looked right I carveddeeper. Then, with a 1" sanding disk, cut the sides of the face back a bit.
Brought the above image into PhotoShop and found that the top of the head didn't look right - to me. So - with a little cloning of the background, I changed it. The outside images are the originals, the inside images are the "adjusted".
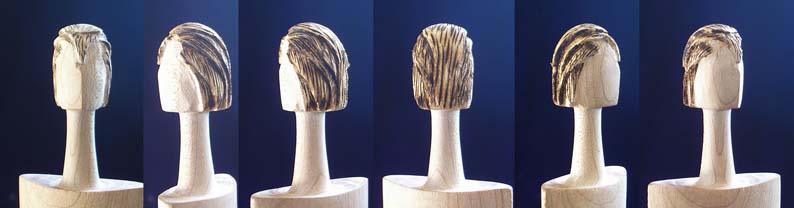
Here's the next step - carving the hair. As usual, I got into carving, again with a Foredom flexshaft and bur.
Continuing farther off the pathof K.I.S.S. (Keep It Simple Stupid), a little pyrography with a Razer skew pen.
7//9
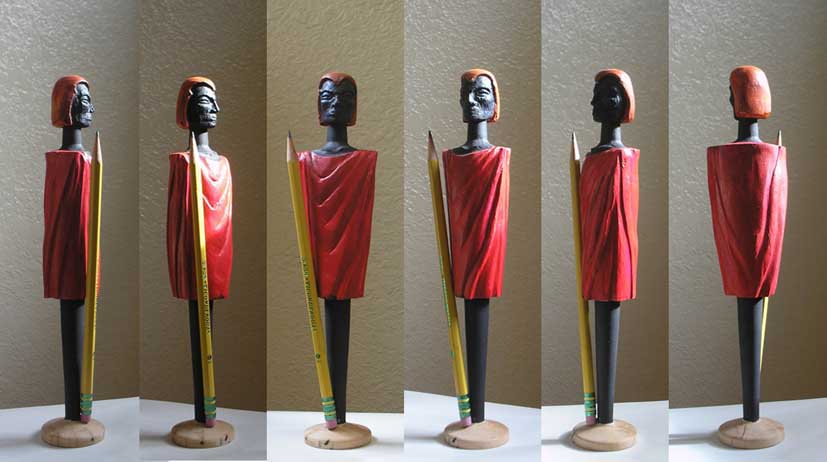
Time to add the color.
But first, I need to do a little careful "soda blasting" (baking soda powder as the abrassive in an air brush size "sand blaster") to remove some of the charring of the pyro work.
The hair was done with Golden's Fluid Acrylic with a little Retarder to thin it and slow the drying time. The color was built up in four layers - from dark to light - the lighter colors added using a "dry brush" technique Jaques Vesery demonstrated at the AAW San Jose Symposium in 2012.
Saw a new to me alcohol dye at a local Michaels store - Jim Holtz Adarondack Earthtones Alcohol Ink, 1/2 fluid ounce about $4. Tested on a popsicle stick, it colored the wood without hiding the wood's grain. penetrating rather than sitting on top like stains do. Since the figure of the wood on the "robe" of this piece cascades down it, like folds in a robe, I wanted to keep it subtly visible. Alas, this new alcohol dye penetrates and dries VERY quickly straight out of its little, drop at a time, squeeze bottle. SinceI hadn't "sealed the grain" first, I got The Splotchies. I'm going to sand some of it off and dilute this dye quite a bit to permit layering it on and contolling it better.
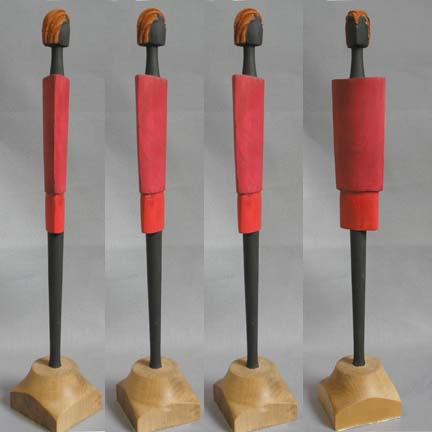
Skipped the thinned dye idea and went with two coats of thinned red fluid acrylic paints, applied more like a wash than paint. Results are subtle - but there for anyone who cares to look closely.
 0
0