Joe, a tree trimmer friend, happens to be a wood phreak with a deep respect for trees and knows of the beauty they often contain within. Though he's not a woodworker - yet - he hates to see nice wood go to waste in a land fill. I showed him some of my turnings - and he started bringing me logettes of wood I might be able to turn into something that shows off some of the wood's beauty.
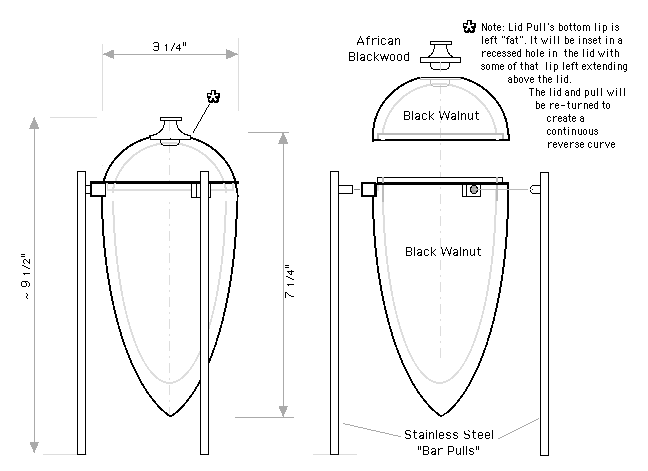
So - with that context - here's the beginnings of Joe's Suspended Walnut Amphora - a token of appreciation. It's basically a lidded box with finial/pull. I really enjoy doing lidded boxes with finials. Getting the fit of the lid just so - either a Pop Fit if I want ot impress other turners, - or - a Lift Of With One Hand Fit if the box is for a non turner - is fun to do. Getting the lid and finial/pull to flow together - a continuous reversing curve - as opposed to This Stuck On Top Of That - takes some precision turning - also something I enjoy doing. The "supsended" idea was the result of an article on Supended Vessels by Neil Scobie in an AAW's American Woodturner magazine. The idea of using cabinet door "bar pulls" for the legs was a serendipitous thing. I was getting the bag of craisens (cranberry "raisens") out of one of their kitchen cabinets. The cabinets have "bar pulls". Hmmmmm - these could be modified and used for the legs of Joe's piece . . .
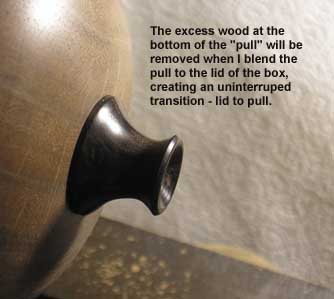
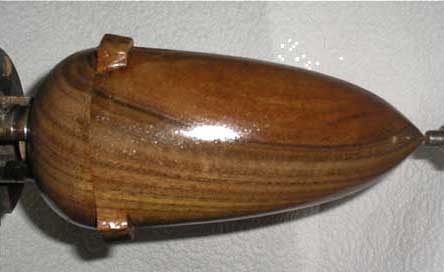
One of the tricky parts of turning lidded boxes is getting the grain to appear to flow uninterrupted. Because I needed extra wood at the top of the "box" for mounting the legs later, getting that grain flow is a bit trickier, And the blending of lid to box can't be done - until most of the excess wood at the rim has been removed. Getting that excess wood removed while keeping the flow of the curves of the piece blending together also turned out to NOT be a trivial thing. Turning - and carving / grinding / micro-planing and sanding is a SUBTRACTIVE process. Remove too much wood anywhere and everything has to be scaled down.
Getting the lid and box to flow together was probably the most "challenging" - tedious, time consuming and nerve racking - part of doing this piece. A flat micro-plane/ "file" helped a lot - but I relied on hand sanding - progressively through from 120, 150, 180, 220, 320 and finally 400 grit - as I got closer and closer to the blending I was after. If I do any more suspended vessels, I'll start with a "snap fit" lid - so the still chucked lid can hold the box in place while doing the "blending" - rather than relying on pressure from the tail stock. Once all the blending is completed, the lid's fit can be turned to be looser - One Hand Loose.
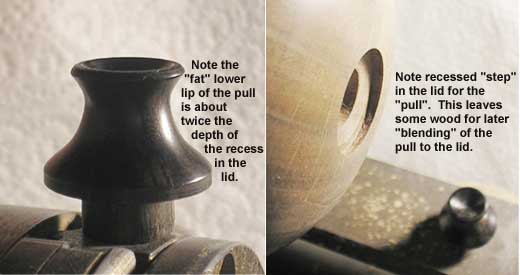
Here is another "challenges" of the piece - the Lid To Pull transition. Normally, the finial / pull of a lidded box is a Stick On - a tenon on the finial / pull in a mortise/hole in the lid of the box. A bead is usually used where the two parts meet - and a reverse curve / cove often above the bead, The bead lets you visually imagine that the inward curve of the top of the lid is flowing into the reverse curve at the bottom of the finial/ pull - reducing the Stuck On Top look of the finial /pull. You still, in fact, have a Stuck On - but it looks nicer.
What looks even nicer - is to BLEND the lid and finial/pull together - creating a smooth continuous flowing reverse curve. Takes a little more work, and is riskier because the fit has to be near perfect and the lid and finial/ pull hve to be turned together for it to work.