A Brainstorming Example
Our turning club's President's Challenge for February 2009, rather than the usual "starts with an "F" since February starts with an "F", was "holes". "Holes" - that's all I've got to work with. The seed for this brainstorming sessions is HOLES.
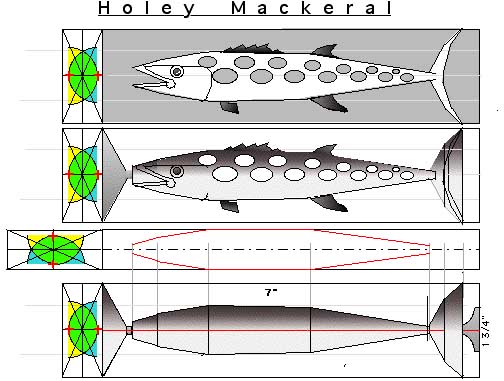
Two ideas came to mind immediately. The first idea that popped in my head was Hole-ee Mackeral!
Hole-ee Cow, Hole-ee Smoke and Hole-ee Crap also came to mind - but a mackeral probably would be easier to turn on a lathe.
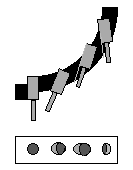
How, and what it would look like came later. A little Google searching for pictures of a mackeral, a little thinking about how to turn a mackeral and I had this. A little turning, a little hole drilling, some sanding, some gloss white, some metallic silver, light blue, dark blue and maybe some gloss black spray paint, along with four or five coats of very glossy clear lacquer, four pieces of veneer cut to be the fins, a few sawcuts for them to go into, some glue and Hole-ee Mackeral is almost done.
One creative possibility developed and the way to make it real more or less worked out.
On to another possibility.
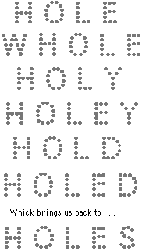
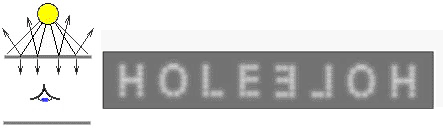
The second idea focused on the word HOLES. Why not spell out the word HOLES - with - holes - in a primitve CAD program.
.
With the outline of the letters it was easy to fill them in - with - holes - then removing the outlines.
![]()
It's also easy to manipulate "objects" in CAD programs - so I created a mirror image of H O L E S.
![]()
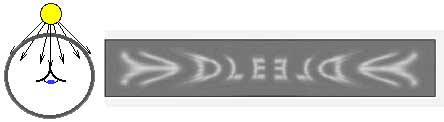
Things start getting ambiguous, the dot patterns requiring some interpretation
- letters?
- letters which make up a word?
- AH! HOLES.
If you start making copies and flipping and turning them the letters start losing their meaning and merely become a dot pattern to play with - and a bit trickier to interpret..

Which sent me off in another direction on the Ambiguity Trail - HOMONYMS - words that sound alike - but aren't spelled the same way - or have the same meaning.
HOMONYMS probably occur in all languages. In spanish, the word "como" can mean "I eat" OR the word "how" or "why"
"Yo como" or just "Como" - means I eat.
"Como hacer esto?" - means How to do that.
:Como no?: - means Why not? .
So "Como como como." is a real sentence - "I eat how I eat.".
THAT could be interesting if placed - in holes - around the rim of a plate or platter. And since I have access to a laser engraver, the holes making up the letters could be done very precisely with a laser engraver. Having the stuff to take an idea and make it into something real is kind of handy - for "creative" people. Also a great excuse to acquire a tool you have no immediate need for - but might - in the future.
So the meaning of the spoken homonym is contextual - in one sentence it has one meaning -, in another it may have a very different meaning. "A" HOLE . has a very different meaning than A HOLE. .
But holes have other possibilities - the way they play with light. What you see will be contextual - where's the light, where's the piece with the holes in it and where are you relative to the light source and the piece with the holes in it. The context clears up the ambiguity - just like clearing up the meaning of a homonym.
So let's go with "holes", "light" and "context" - and see where that might go.
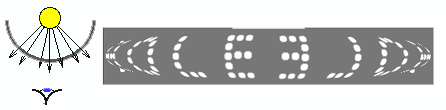
If you and the light source are on the same side of the piece with the holes in it, the holes don't reflect much light - and don't stand out. Ambiguity - or basically - invisible. They may be there - but if you don't notice them - for you - they're not there (THEY'RE and THERE - Homonyms!)..
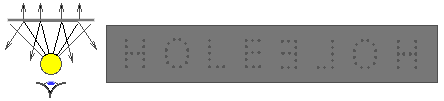
But if you're in front of the piece - and the light is behind the piece - the light coming through the holes makes them stand out. No ambiguity about the holes now. There's still that mirror imaged letters confusion which requires some interpretation, but the presence of holes, the Negative Space (or as the really artsy refer to it "The presence of absence") is quite clear.
But what if the surface that has the holes in it is curved - on two axes? The Ambiguity Factor goes up a bit?
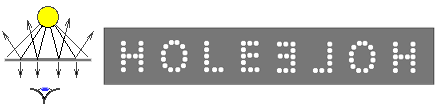
And there's another possibility - light source on the "outside" of the piece, you looking at the "inside" of the piece at the light shining THROUGH the holes ONTO another surface parallel to the surface with the holes in it. Now the holes PROJECT the light onto a screen - a bit fuzzy, and a little ambiguous - but you can make sense of the information you see.
Let's kick up the Ambiguity Factor - by putting the light source outside - a cylinder, What would you see on the "screen"?
Opportunities to explore how holes and light interact with what the viewer sees and interprets . . .
But let's play with another thing about light and holes - shadows.
What if the holes ARE NOT square to the surface they're in?
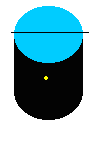
And what if the surface the holes are in is - CURVED - like say - a bowl or other "open form"? Then what would you see?
But What If - the holes were drilled in a hollow form - with a lid? The inside of the piece would be dark, only a small amount of light coming through the holes in its side to illuminuate the inside of the piece just a teeny tiny bit. And if the holes themselves are really small - and hidden in a texture - they'd be invisible - or more accurately, lost in the background - the texture. To see the holes you'd need light coming OUT of them - from inside the piece.
Now unless the piece was VERY big, putting a regular light bulb inside it is out of the question - ignoring the issue of what heat from the light bulb would do to the piece or what a power cord coming out of it would do to the look of the piece. A fluorescent light would reduce the heat issue - but there's still that SIZE issue. And then there's the source of power thing. A cord coming out of the piece and plugged into the wall still isn't very aesthetic looking.
Hmmmm - what about LEDs? They're small enough even for a relative small hollow form - like a box - and they can be battery powered - with pretty small batteries.
So I picked up an assortment of little battery powered LEDS ( they seem to be everywhere these days ) drilled some small - really small - holes at various angles in a piece of black ABS pipe after painting the inside of the pipe white. Placed a little LED inside, turned it on and moved the pipe around.
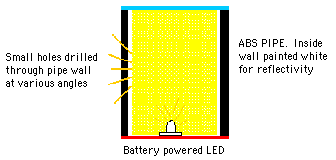
As I rocked the piece of pipe fore and aft a little dot of light seemed to dance around on the surface of the pipe.
This Holes & Internal Light Source thing has some interesting possibilities. Theoretically, one could put multiple patterns in the same surface area, changing the viewiing angle of that surface changing the pattern that's seen. With the internal light OFF, the holes would appear merely as a random texture. With the internal light ON, and with some careful planning and hole drilling, multiple images could be seen, changing one into another as the piece is moved.
Holes sure have a lot of possibilities. Make that "The use of Negative Space presents intriguing avenues to explore - and exploit - creatively (?)"
Now let's drop "holes" from the Brainstorming and see where else using an internal light source might lead.
This internal lighting idea has another interesting possibility - using translucency.
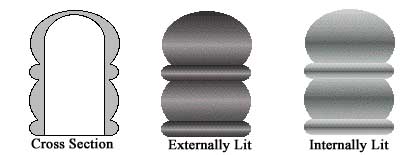
It's not written in stone that turnings have to be in wood. Turners turn ivory, seed pods, nuts and plastics, along with "stabilized" corn cobs and I've seen a method for turning a bunch of little pine cones and seeds - encapsulated in plastic resin. But lets keep it simple and play with white PVC "schedule 40" (thicker walls) pipe you can get at any Big Box store like Home Depot or Lowes or lawn and sprinkler outlets. Because it's white all the way through, the inside white reflects any internal light. How much of that internal light affects the external look of the piece is a function of the wall thickness. Thinner lets more light through, thicker less light through. What would be shadows when externally lit - the low areas of the turning - become light areas when internally lit., completely changing the look of the piece.
And while on the subject of light, there's another way to play with how light interacts with a surface - specifically a transparent - curved shape. You've seen light glistening off a dew drop - and may have wondered why the painted stripes on a road seem to glow in your headlights at night. Ever wonder why the white striping on a road seem so bright - almost glowing?
Beads - glass beads - little tiny glass beads - grain of sand sized glass beads.
What if you put a couple of these tiny glass beads in a few low spots in a textured areas? Until the light hits them just right, they're transparent. But at the right angle - they'd glisten!

Here's another way to change the look of a piece as you move around it, or hold it and turn it. I used this one on a painting - stippled the base Gesso, painted the subject with black, then shot trransparent red almost parallel to the surface from the left and translucent blue from the right. Background changes as you change your viewing angle. From the left, the background looks red, from straight on the background looks purple, and from the right the background looks blue.
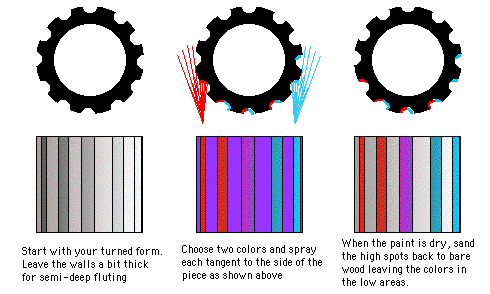
Apply this idea to a textured surface - say a fluted cylinder. As you rotate the cylinder you'd see red vertical stripes on the left side of the piece, blue vertical stripes on the right side and purple vertical stripes in between. Your mind would initially register the color of the stripes - and then try and resolve the apparent paradox. as the piece is turned. As you turn the piece the Purple Stripe SHOULD move left or right as you turn the piece. But when you do - it DOESN'T.
How can the purple stripe that was in the middle become red or blue as the piece is rotated left or right? You will figure it out - but for a second or two - what you ASSUMED you were seeing - and what you were ACTUALLY seeing - were NOT the same. That's the key to illusions.
How much of what we experience is actually an illusion? It's the old "I dreamed I was a butterfly. Now I wonder if I'm a butterfly, dreaming that I'm a human being?" thing.
So now you've gone through a brainstorming session which actually occured - over two or three days
Wonder which ideas for a piece became an actual piece?
Going with "holes" - literally - and "Hole-ee":
Hole-ee Mackeral!
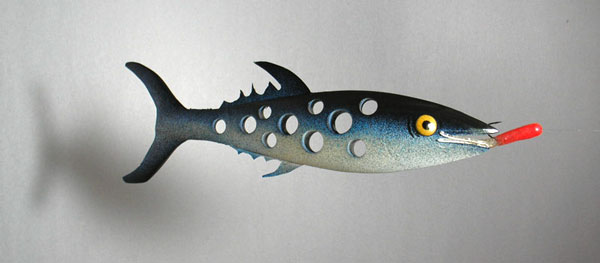
If you want more details on Holey Mackeral - click here.
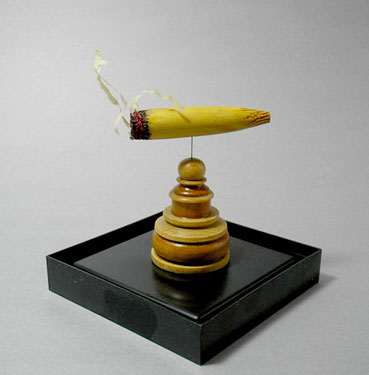
A little turning of some Yellow Heart, some red fingernail polish (don't ask), a little addition of with a black Sharpi felt tip pen, a short piece of small diameter spring wire, a couple three shavings glued on - and BINGO. The "smoke" is kind of delicate so the piece has a clean plastic box (not shown ) that fits over it, the display box conveniently available at my local TAP Plastic store.
Hole-ee Smoke!
 =
=
Here's one way to use Translucency, Internal Lighting and some Schedule 40 PVC plastic pipe- a Sceptor (Magic of course) - an internally lit Magic Sceptor.
Hey, no one said you can only turn wood!
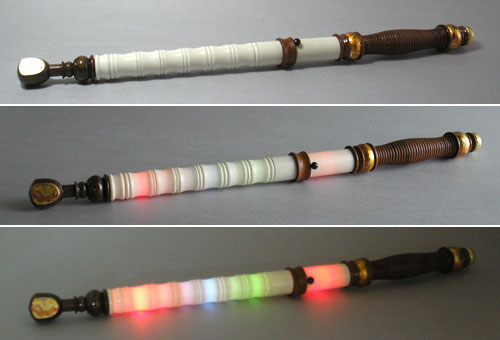
If you want to see the inside of this Sceptor click here
And a pierced piece - with internal lighting - not the best piece I've ever turned and I still need to turn a finial for it, but it does demonstrate an idea I'll probably work on some in the future. There are three pairs of "hole" words hidden in this one - Hold/Holed - Whole/Hole - and Holy/Holey,
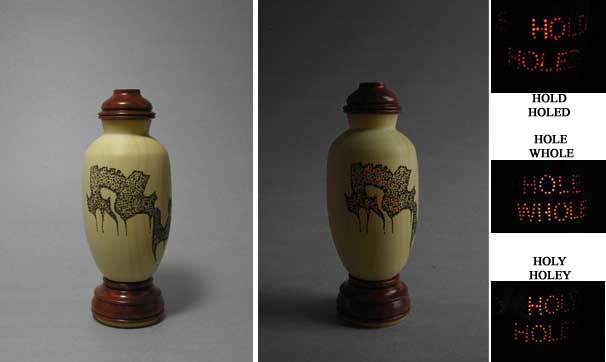
If you want the details of this one click here.
There you have it - an example of a Brainstorming Sesssion - and the pieces that resulted from the session. Now that you've seen how it's done - when are YOU going to try some Brainstorming?
BTW - feel free to use any of this stuff as starting points for one of YOUR brainstorming sessions.