How to Turn Stylized Human FIgures on 6 Parallel Axes
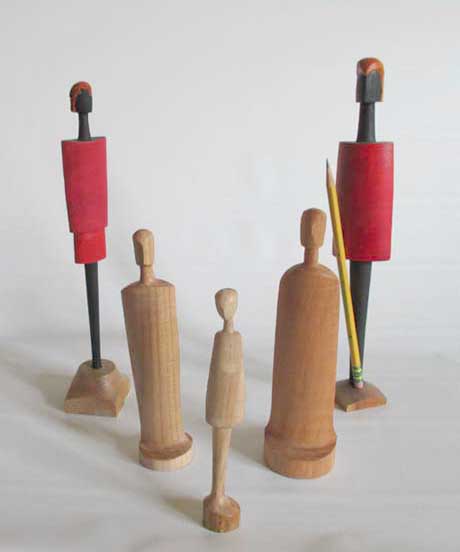
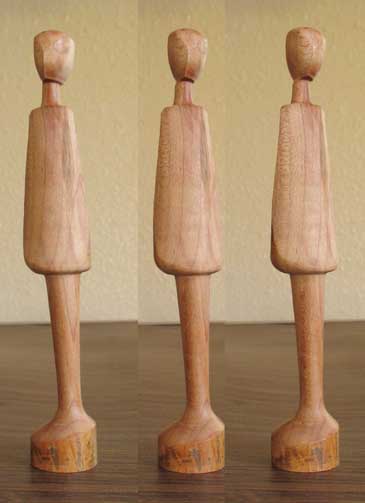
What follows is an attempt to show you how four of these human figures were turned on 6 parallel axes on a lathe. The fifth figure, the one in the foreground, is a little more complicated - but we'll get to that in a bit.
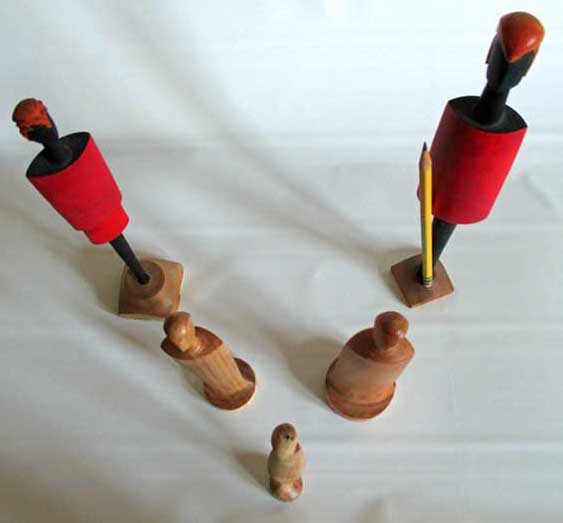
A higher angle shot reveals how these figures were done on a lathe. Note that the cross sections of the heads are triangularish, while the "bodies" cross sections are lens shaped, as opposed to the round cross section you get turning on a single axis. And because they're not round, these figures have directionality - definite front, back and left and right sides.
OK - let's start this HOW TO with the simplest of there figures - the one I think of as Ceaser, because he looks like he's wearing a toga. Here's a right side view and a front view, along with the cross sections of the piece at key locations and the cirlcles or overlapping circles used to turn those cross sectionsc.
Remember that we can turn to Round or merely to PARTS of Round - specifically ARCS.
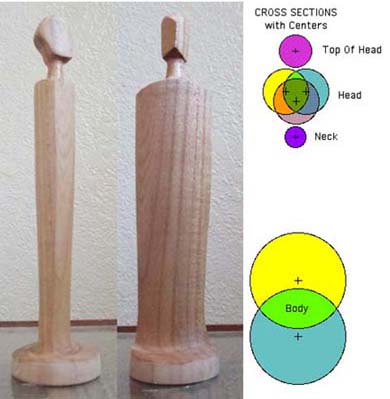
The top of the head is round in cross section, hemispherical in profile, done on a single axis - just offset from the central axis of my blank..
The head is done on three axes that are parallel to each other - and in this case - also parallel to the central axis of my original blank.. Three intersecting arcs create a triangularish cross section with a left side, right side, front and back.
The tapered cylinder neck is done on the same axis as the top of the head and turned to a round cross section.
The "toga" is done on two parallel axes, turning two intersecting arcs to create a lens shaped cross section with a front and back. sides and left and right edges.
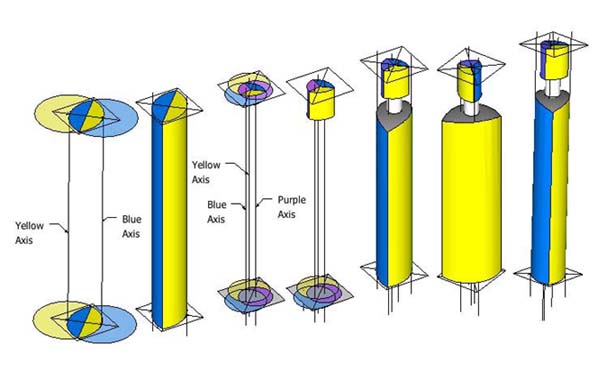
This next illustration shows the axes used to turn the body as well as the head - and the resulting shapes and their cross sections. Spend a little time studying this illustration until you understand What Does What - which axis is used to produce which surface, which other surface or surfaces its arc will intersect and how its depth of cut will effect the location of the edge that it produces as it intersect its adjacent surface or surfaces.
Note that it's best to start with a square blank so you can
- keep track of the orientation of the axes and the resulting directionality of the turned surfaces
and
- layout the centers on each end of the blank correctly (being off with the Centers layout
. can introduce twists, turns and tilting in the turned outcome. More about that in a minute
Let's see how to turn the head to the right. At the top of this next illustration we have the same centers as the previous illustration and the same lens shaped cross section for the robe / body. Below that we have three ways to orient the head. On the left is the Looking Straight Ahead version you saw in the previous illustration. But for the next two to the right. the head is turned to the right, 30 degrees right and 45 degrees right.
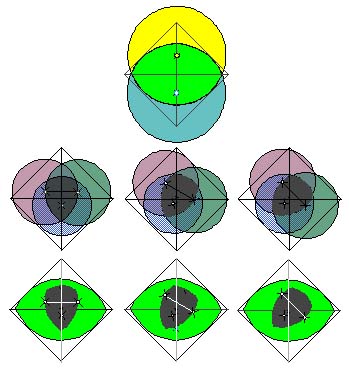
Look at two of the bottom figures. Rotate the head's centers and you turn the head - left or right.
Let's see this Turned Head idea in virtual 3D
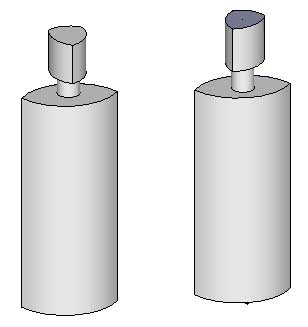
OK, so we can turn a torso with a front and back and with left and right edges, a head with a left side, right side and back side and a round cylindrical neck and/or legs - using multiple axes by turning not just circles but also Arcs - that intersect. And we can turn a head that faces left or right relative to its torso. By offsetting the top set of centers for a triangularish head from its bottom set of centers - we can also TILT the head to the left or right or raise or lower the chin - or both.
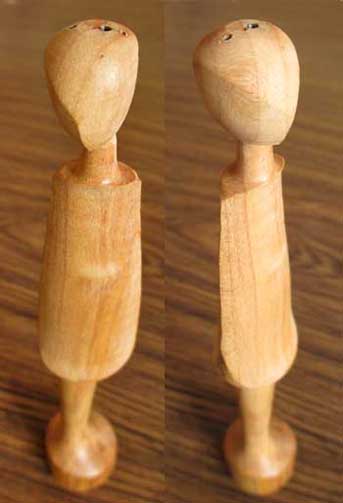
These options are just some of what multi axis turning brings to sculpting on a lathe. Multi axis turning makes it possible to turn subtle, more nuanced human forms - like this one of my oldest grand daughter Kaitlin when she was maybe 6. A pixie cut, long legs, cute little girl dress and a way of tilting her head to one side and looking up at you in a way that made it nearly impossible to refuse her anything ; )
In this view you can see that the top of the head is domed, the head triangularish, the neck turned to round and tapering, the torso lens shaped and the legs round and tapering. The parts are basically the same as used for the two Masai you saw at the top of this page.
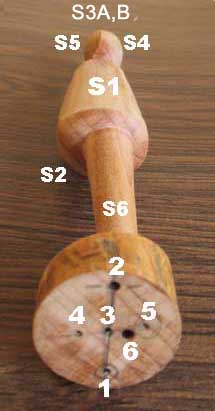
In this next photo, the surfaces S1 to S6 were turned respectively on the axes whose centers are indicated as 1 through 6. Surfaces S1 & S2 were turned on Centers 1&2. The triangularish head with Surfaces S3A, S4 & S5 were turned on Centers 3, 4 & 5l. The "legs", Surface 6, was turned on Center 6.
I'm hoping that by now you are interested in turning your own multi axis human form. To make it a bit easier for you I made these patterns that layout the centers for the torso, head and neck. You can download the image. You can then copy and print the Top Centers and Bottom Centers of the one you want to turn.
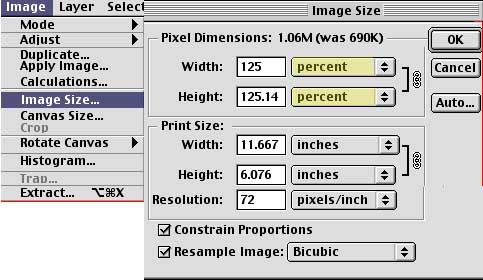
These are all done for a 1" square blank, but you can use PhotoShop to scale it up or down to any sized square blank. The example below shows how you can get PhotoShop to scale a 1x1 blank patterns to work for a 1 1/4 x 1 1/4 blank.
Now about your Blank Length. You want to add an inch to your desired figure height. This will give you some needed "extra meat" while turning off center - half an inch above and half inch below your intended figure.
OK, you have everything you need to turn your own version of one of these human figures. Question is - will you give it a try?
If you have any questions email them to me charlieb@accesscom.com