Wood is an amazing material with some interesting qualities. If you understand wood - you can exploit its special qualities. One of those qualities is the look of its "grain".
Now imagine cutting a bundle of soda straws at different angles and apply a translucent dye to the resulting surface. The end grain will soak in a lot of dye. The dye will pretty much remain on the surface of the sides of the straws - a very thing layer of dye. The thicker the layer of dye you're seeing the darker the dyed area will appear. Conversely, the thinner the layer of dye you're seeing, the lighter the dyed area will appear.
SO - the farther you can see down a "straw" (into the end grain) - the darker it will look - since you're looking through a "thicker" amount of dye. Looking at the side of the straws (at side grain) you're looking through a very thin layer of dye - so it will look "lighter" than where you're looking into end grain
Knowing, understanding and using all this permits you to increase the contrast of the "figure" in a piece of wood - "popping the grain / figure".
If black and white line drawings - even with accompanying text - is ok but you want to see a Real World Example - check THIS out.
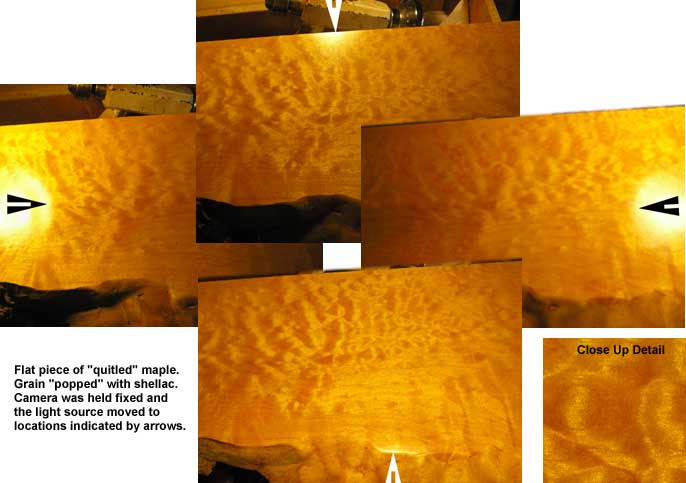
To see a video of this piece and how it changes as a single light source is moved around it
CLICK HERE
Now if you want to REDUCE darkening of end grain when dyeing - sand it at least two sandpaper grits higher than what you used on the side/face grain - and seal the end grain a bit.
If you don't seal/plug the end grain, it'll take in more dye than side/face grain - and be darker. If you don't want that to happen put some lighter colored shellac on the end grain, it'll darken a little but not a whole bunch. Sand the end grain lightly little - with 320 or 400 grit to level things off a little and take off any "raised grain" - and then apply your dye.
