pWeekend 5 - DYING
Poplar is a pretty bland wood - less expensive - but bland. The next step was to make it look a bit more interesting - like say - aged cherry or mahogany. And this is where the Newbie starts "seeing" the finished piece. Up to this point it has been a bunch of cutting and routing and sanding of a lot of parts. But once color is added the piece starts coming into focus.
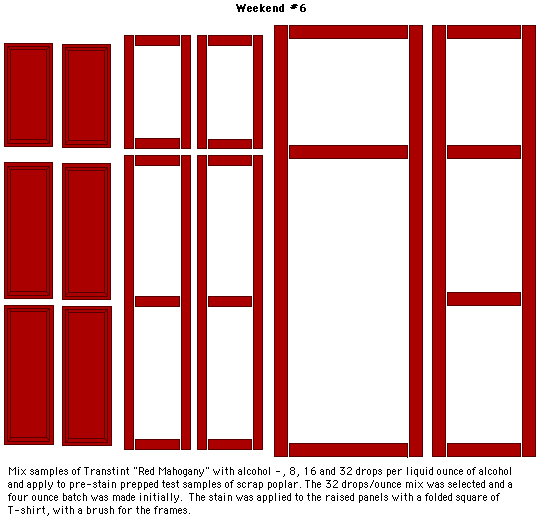
Once again, my role as mentor was to provide options. So I did samples of reddish stains and dyes - Varathane's Cabernet stain, Behlen's Solar-Lux Medium Red Mahognay Stain, TransTint's Reddish Brown # 603 and 603 plus a little Amber Additive #600. The stain hid the grain too much, the Behlen Medium Red Mahogany was too red-purple so she went with the TransTint Reddish Brown mixed pretty dark - 32 drops per ounce of alcohol. It would have been better to go with half that concentration and applied the dye in multiple coats, sneaking up on the final color - but Newbies are typically impatient and all the multiple passes raising the panels had probably pushed the Patience Limit.
The last thing you want to do as a Mentor is discourage, or bore the hell out of, the Mentoree. You want to keep the feeling of accomplishment going, with milestone rewards the Mentoree can see and feel - parts cut and layed out to see the actual size and shape, joints cut and the parts dry fit, noting how the look of the wood gets more interesting as the sanding progresses, brushing on shellac sealer and seeing how the look of the wood changes again, tuning the fit of the raised panels in their grooves so they slip in place Just So. Once you 've been through it once it's easier to understand and appreciate the steps along the way, and see them in terms of the results at the end of the project.
So Coloring The Wood is a MAJOR milestone - but fraught with danger - The Splotchies wait in anticipation, ready to ruin all the previous hard work, or at least be a major set back. Staing or dying is frequently a crap shoot - the results less predicatable than any other step in making a piece of furniture. But - if you understand the potential pitfalls, their causes and how you can lower the odds of having a disaster - the process can be more fun and less worry.
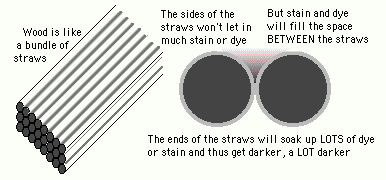
Think of the wood's grain as a bundle of straws. Coating the sides of the straws with a stain or dye and wiping it off won't leave much color behind. But when you coat the ENDS of the straws, the stain or dye will get down INTO the inside of the straw, leaving it behind when you try and wipe it off - causing it to be a LOT darker.
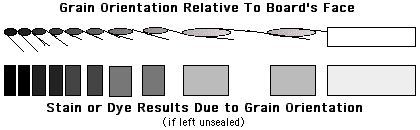
If you're going to stain a piece, especially poplar, though cherry is also notorious for "splotching", as is pine, good stock selection can save you a LOT of grief. Quarter sawn boards are pretty predictable and stain or dye fairly uniformly. "Flame / cathedral" grained boards or boards with knots or which had a branch coming out of them at a shallow angle are at the other extreme, with end grain coming up out of the face of the board - wating to soak up LOTS and LOTS and LOTS of stain or dye. That means they'll be much darker than adjacent side grain once stained.
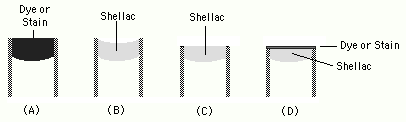
There are things you can do to REDUCE "splotching" (very uneven absorption of stain or dye). You can "prep" the wood with something that will "plug up" / seal the ends of the end grain - wood sealers - like shellac. Two or three coats of a thin shellac (a "one pound cut, about 4 ounces per quart), with a light sanding between coats can reduce the amount of dye end grain absorbs
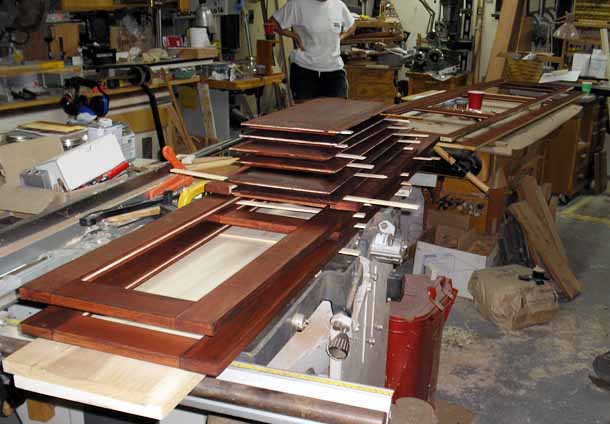
So - after lightly sanding everything, a "spit coat" of shellac was applied, extra put on end grain. A light sanding after it dried and it'd good to go, or in this case - dye. There was a lot of surface area to dye - about 70 square feet of surface area - or over two full 4x8 sheets of ply worth. As you can see you need a lot of room to store the parts as you go. And keep in mind that both the Show Face and the Other Side were dyed. So the joiner tables were used, the workbench as well (note the brown construction paper covering the bench top to protect it from getting dyed) - AND much of the 4x7 assembly bench in the other room of the shop.
NOTE: Unlike wipe on. wipe off stains, dye penetrates the wood, deeper and therefore darker, in end grain. That means that the rate of application needs to be fairly uniform, with as few Stops and Starts as possible. That presented a few "challenges" since we were using alcohol in which to dissolve the dye - and alcohol dries pretty fast. So for the rails and stiles of the front frame and the side panels frame a foam brush that could hold a lot of dye was used in order to make LONG, uninterrupted passes. With the panels, a piece of folded up T-shirt was used to give better control on the end grain.