(small print - The following are merely my observations and opinions and should be taken as such. I assume no responsibility for any use or misuse of this stuff by anyone, anywhere at anytime.)
Blade Height
There seems to be two schools of thought on how high the blade should be set. One says "Set the blade as low as possible - two exposed teeth above the top of the board. If something goes wrong you probably won't loose a whole finger or two.". The other school of thought says "Set the blade as high as it will go.". The former exposes the least amount of the blade to your tender flesh. tougher tendons, harder bone and various easily severed blood vessels (got your attention?). The Blade High school note that fewer teeth in the wood means fewer opportunities to grab the wood, the primary concern being kickback and assumes you'll take all the necessary precautions to keep your tender parts away from the spinning teeth. The Blade High method has one advantage - less burning of the sides of the cut - a common problem with maple and cherry. But if the blade is sharp AND clean, along with a faster feed rate, burning isn't a problem.
So let's look at the forces and the direction of forces associated with these two schools of thought.
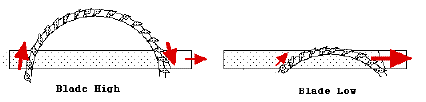
With the Blade Set High, most of the force at the front of the cut is DOWN, into the table and not back towards YOU! However, IF the stock at the back of the cut does come into contact with a rear tooth or two, there will be a lot of force trying to lift the board straight up and then into the teeth moving horizontally towards YOU! When the blade is set high, it's harder to set feather boards or other "hold downs/ hold ins" close to the blade, both in front and behind the cut in the case of hold downs.. Because the cutting teeth are traveling almost straight down, Blade High can cause tear out and split out on the bottom of the cut. The biggest problem with Blade Set High is all those exposed sharp spinning teeth!
With the Blade Set Low, most of the force at the front of the cut is TOWARDS YOU. If the stock contacts any teeth behind the cut, those teeth will be traveling primarily TOWARDS YOU. There are fewer exposed teeth to potentially make contact with your flesh and you can set "hold down/ hold ins" almost on top of the blade. As a bonus, you get less chip out/ tear out on the bottom of the cut.
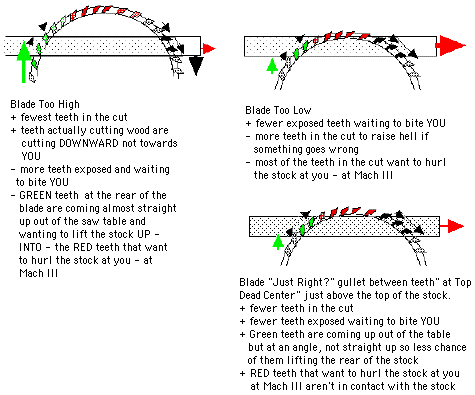
My vote is for Blade Set"Just Right"
Hold Downs/ Hold Ins
To prevent the stock from lifting up off the table and into spinning saw teeth you need something to hold it down tight against the table. You'd also like to keep one edge of the stock tight against the fence. Finally, you'd like to keep the stock from moving back towards you at a high rate of speed. That's where Hold Downs and Hold Ins come in.
Below are three examples of these types of table saw accessories.
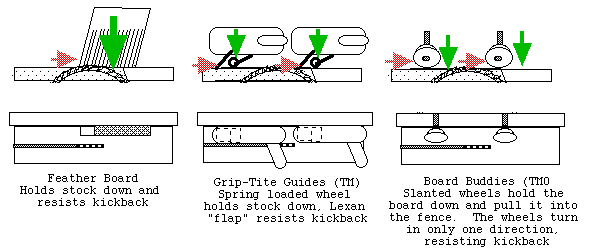
First is a Featherboard - with "feathers" or more like a comb's teeth pressing down onto the stock and pointed towards the rear of the blade. These hold the stock down and resist movement towards the front of the blade. It's simple to make and clamp to the fence.
Next is a pair of Mesa Design Grip-Tites (TM). These have a small wheel that looks like a small sanding drum which is spring loaded to press down on the stock and is angled towards the fence to pull the stock into the fence. Behind the wheel is a piece of lexan that also presses down on the stock AND resists movement towards the front of the blade. They're held onto the fence with a very strong magnet. The main disadvantage to Grip-Tites (TM) is that they get in the way of your push stick near the end of the cut. If you're ever at a woodworking show and get a chance to watch a demo of these things be aware that you'll a) feel the urge to duck many times during the demo and b) when it's over you'll find out two units with a steel fence face plate will come to about $10 a finger (includes thumbs). I value ALL my fingers and both thumbs so the price was definitely worth it to me.
(Note: I have no affiliaition with Mesa Designs - the makers of Grip-Tite, I'm just a satisfied owner. And I do enjoy watching Mike or his brother demonstrate how even doing the classic kickback initiator moves - one finger feeding of stock to the blade, stopping in the middle of a rip and letting go of the stock, pulling the stock into the blade from behind the cut and - my favorite - squeezing the kerf shut behind the blade while pulling left/right on the stock.)
Finally, a pair of Board Buddies (TM). Each has a conical wheel which presses down on the sotck and pulls it into the fence. The wheels have a mechanism that permits them to only turn towards the back of the blade and therefore resists movement towards the front of the cut.
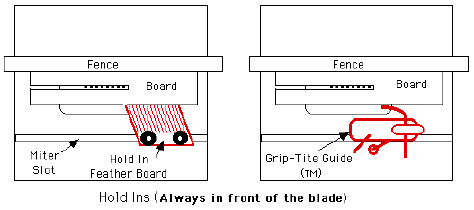
NOTE: DO NOT SET A HOLD IN BEHIND THE CUT! Anything that causes wood to contact the rear teeth is a NO No!
There are other Hold Downs/ Hold Ins but these give you the idea - hold the stock down, pull or push it into the fence and work against movement towards the front of the cut.