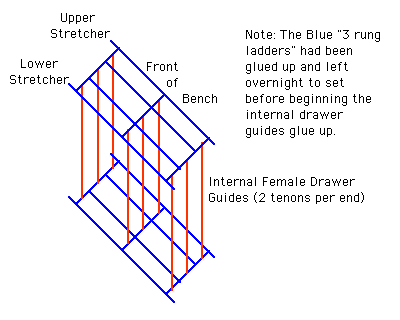
Now for the fun stuff - a hairy glue up.
Though the illustration is for a six drawer unit, the real McCoy is an 8 drawr unit. Twelve guides, two tenons per end, two ends each comes to FOURTY EIGHT (48) mortises to get glue in and 48 tenons to get glue on. AND they all have to be aligned, clamped and squeezed together - IN THIRTY MINUTES or less.because that's the working time for the liquid hide glue (a Titebond product BTW)- about 30 minutes.

With the back of the bench "3 Rung Ladder" up on blocks to allow for clamp space under it, all the necessary clamps selected and at hand, a couple of trimmed soldering brushes and the liquid hide glue at the ready, I set the egg timer for 30 minutes (talk about pressure - tic-tic-tic!).
Started with the "bottom" guides first. Glue on all the internal faces of the mortises and then it was one at a time for one end of each drawer guide. Glue, align, seat, move on - glue, align, seat, move on - tic, tic, tic, tic. Easy - plenty of time.
Glue on all the internal faces of the mortises in the front of the bench "3 Rung Ladder" and then on all faces of the standing upright internal drawer guide tenons - tic, tic, tic. "Maybe I should have waited for help. Maybe I should have done this earlier - before the shop got hot - sure is hot in here. Wish I didn't have to keep wiping the sweat off my forehead before it gets in my eyes - again. Man is it hot in here or what?" Tic, tic, tic.
Making sure of which way was UP I started by aligning one tenon with its mortise and worked my way around aligning other "touching" tenons. Time for the clamps - 12 clamps actually. A little pressure here and there and joints start closing - tic, tic, tic. "Sure is hard to see things upside down, wish this clamp wasn't in the way. Sure is hot in hear." Tighten the clamps, check the alignment and tighten some more - tic, tic, tic. "Hell, I've got over 10 minutes left - no sweat, figuratively of course. Sure is hot in here!"
The hard part over it was now just a matter of working my way around all the clamps, tightening each a little . One was harder to tighten but I figured it was just a tight joint made tighter by the glue so I really cranked it down. Tic, tic, tic.
"What the hell was that noise? Something's WRONG."
That tight tenon wasn't tight, it was shorter than all the others by just a bit and it had moved out of alignment. When I honked down on the clamp one of its narrow edges split out and that would keep the joint from closing and that would keep adjacent joints from closing and that my friends spells trouble, with a capital T - TROUBLE - right here in River City! - TIC! TIC! TIC! ...
Oh @#*%$@!^#!!&*#@!!!#!!!!! !
There was no way I was going to start over, there just wasn't time - tic, tic, tic. Pried the split out piece so it wasn't being compressed, grabbed a chisel and chopped that sucker off - not neat and clean but out of the way. Then it was a speed run around all the clamps, turn and move on, turn and move on - tic, tic, tic.
Get the square and start checking that the guides are square to the "3 rung ladders" and a look for any glue squeeze out - easy to get off prefinished parts. The hard part is over. Tilt the Beast upright on the blocks and tap the through tenons on the stretchers into the through mortises on the legs and VIOLA-DONE! (with minutes to spare even). Another "I can, I can, I think I can, I don't think I can, I can't, I can't, I won't, I think I can, I can AND I DID!" experience.
In retrospect I could have saved myself a lot of grief. Want to know how? Click Here