On Day Two we went over the MDF prototype and the front panel / door idea. Seeing the idea at full scale and with a couple of albums in it verified that the idea would work just fine. BUT - the pegs lock and key idea didn't go with what Chas had in mind for his cabinets.
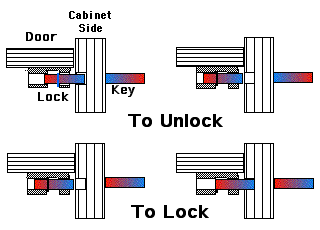
"What if we did the magnet on the inside of the panel/door and had it slide in and out of a non-through hole in the inside of the cabinet side?" he asked.
That's when COW MAGNETS came to mind. I've had a cow magnet floating around the garage - now The Shop - for over a decade. It would be perfect for the new hidden lock idea. Did a sketch of the idea and it was "approved".
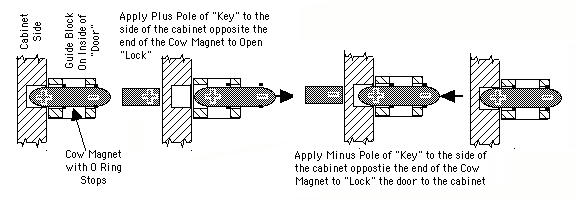
Naturally, when I went looking for the cow magnet it was no where to be found (I'm convinced that hardware is, in fact, alive and plays games with me - getting in the way when I don't need them and then hiding when I do need them. How they know I'm ABOUT to look for them and manage to escape BEFORE I begin to look for them is a mystery to me. That's why I build cabinets and drawers for things I use often. If you give them a nice permanent home they seem to stay put.
A member of the newsgroup rec.woodworking suggested using cylindrical earth magnets rather than cow magnets and pointed me to Lee Valley as a source. Three days later I had four 1/4" diameter by 1 inch long cylindrical earth magnets that are far more elegant than cow magnets..
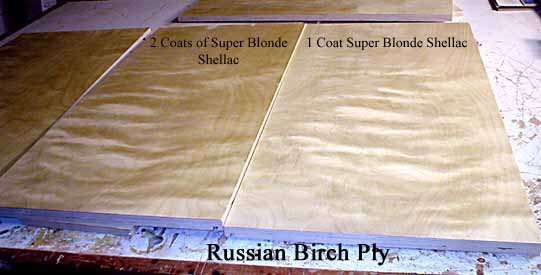
In the meantme, with the basic design done it was on to selecting the wood to make the cabinets. Off we went to Southern Lumber to look at maple and mahogany and ash, cherry, zircote, padouk, walnut ...then down the street to Aura to find some 3/4" baltic birch ply for the carcass/carcase. As luck would have it, they had 5x5 sheets of Russian Birch on sale. Got even luckier when he found two sheets with some really nice figure that looked like sand dunes. The 5x5 sheets wouldn't fit in the back of the van but I'd brought an 8 foot Clamp N Guide and my PC circular saw to cut them down to size.
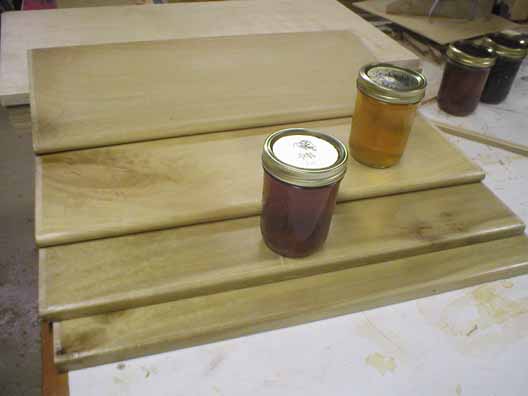
Cut the birch ply sides on the Robland combination machine - the sliding table coming in very handy. Set up the JoinTech router table and fence for the stopped sliding dovetails and turned Chas loose to actually cut them. Changed bits, reset the fence and he routed a groove down the back for the rear ply panel. A little sanding with a ROS, a coat or two of super blonde shellac and here's where the sides are heading.
Have about 400 bf of either honey or black locust in 8 to 10 inch widths and it's pretty strong stuff - perfect for shelves that need to hold a lot of weight. Cut pieces close to the length, and Chas went at them with a #7 to get one edge straight Showed him how to see if a board was flat on at least one side and how to tell where to remove wood if it isn't flat on at least one face. Got out a #5, showed him a little about how to read grain and determine which way to plane and he was off and running. When we had one face flat and one edge straight we ripped the parts close to finished width and he used the 12" portable planer to get the other face flat on each piece.
The bottoms of the cabinets required that he biscuit join two boards so he got to use the PC plate joiner and then glue and some Bessy K-bodies. After the glue dried enough he corss cut the shelf parts on the SCMS and then routerd the male parts of the sliding dovetails using the JoinTech router table and fence, sneaking up on the fit using the fence positioning system that lets you move the fence in 0.001 increments. Finally, again on the JoinTech, he rounded over the front edges of the shelves. A little sanding, a little shellac and the bottoms and shelves were more or less done.