Testing the Arts & Crafts Waters
Arts & Crafts / Greene & Greene / Stickley designs aren't limited to just furniture. It spans the range from architectural scale to smaller things like picture and mirror frames, table lamps and sconces. The latter may be part of the appeal of A&C. New woodworkers often fall into the Use As Little As Possible And Use Every Bit Of This Expensive Wood trap - after learning what a Board Foot is, and checking out the $ / BFprice tag for a project. You can try a relatively small project first, use a few of the A&C design elements and not have to invest a lot of time or money to get a feel for this style of woodworking,
SO - here's a newbie Test The Waters A & C Project which can be as simple or as tricky as you want to make it. What's involved is pretty straight foreward and applicable to making a table, or chair, . . .. four uprights / legs, four aprons, four stretchers - and a top. OK, so tables and chairs and other piece of furniture don't have mounting plates - ALL analogies break down if you examine them closely. BTW - a drawing I did inspired by this piece has a note that says the original is in mahogany, not oak. Teak was also popular in Greene & Greene pieces - but mainly at architectural scale. So when thinking about making an Arts & Crafts piece don't just think in terms of quater sawn oak.
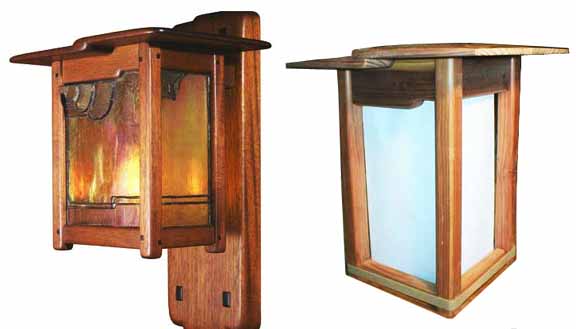
Before we go on, let me apologize for not being able to credit the source for the above photo. I found it and saved it two years ago and can't remember where I found it. My guess is it's from one of the Greene & Greene house sites - Gamble, Thorsen, Blecker. The "cloud lifts" in both the wood, the stainglass, the ebony "pegs" and that it's mahogany point to G&G - and probaly the Gamble House.
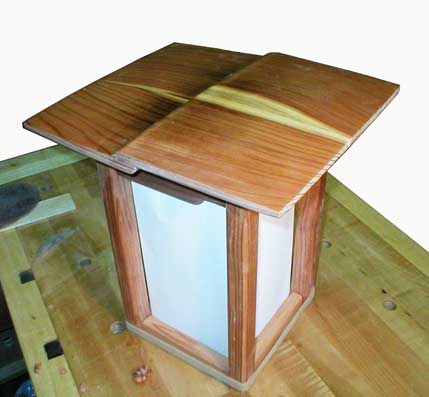
What follows is where I've gone with this idea - before I lost interest and put it away, to complete at some future date - or not. Some projects are like that - get the tricky / fun stuff done and the rest just seems like grunt work. In addition to the Top to Apron fit, the top also lent itself to some subtle shaping which was fun. Joining two boards of redwood - with sapwood on one edge also provided and interesting look to what I was now thinking of as an end table ambiance light lamp
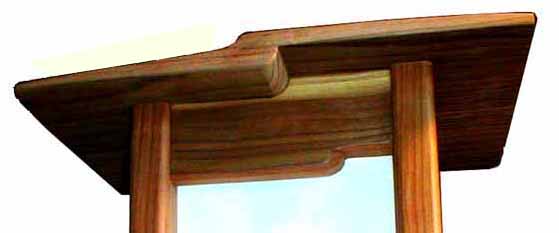
What intrigued me about this sconce is the integration of the cloud lift apron and the top/lid. Ordinarily, on a table for example, the cloud lift is only on the underside of the table's apron since the table top is flat - in most functional table's at least, though a table top with a step in it could be functional - and interesting.
Another Fun & Games with this idea is dealing with the asymetry imposed by the Cloud Lift. When utilizing asymetric parts - how do you end up with a visually balanced whole? A little playing around with an old pre-CAD program called SuperPaint and I had this - the top's Cloud Lift sort of centered
Though, at first glance, this thing doesn't look that difficult to make, on closer examination, the top of the Cloud Lift front and rear "aprons" and the corresponding Cloud Lift top complicate things - considerably. ANY gap between them - will literally be glaringly apparent - when the light is on. If this piece is used as a sconce, as opposed to a modified version as a table lamp, you WILL see the underside of the lid/top and where it meets, or doesn't meet, the top of the Cloud Lift "apron". ANY gap between the two will have light streaming out of it when the light is on. The phrases Light Tight Joint and Glaring Error have real meaning in this piece.
A little more SuperPaint play and I had the basics of how I'd put this thing together - using loose tenon joinery. (I know, I missed putting in the mortise on a "stretcher". I didn't make that mistake on the actual part - honest.)
A Word About Loose Tenon Joinery
Before routers, router bits and jigs to go with them and now the Festool DOMINO, loose tenon mortise and tenon joints weren't practical - to make. End grain mortising with hand tools is just too time consuming and involves too much risk - of splitting the part. Cutting a mortise in side or face grain was pretty straightforeward and cutting the tenon is as well. End grain? Not so easy.
It's the tenon that complicates things a bit. First, the part length must be the Visible Length PLUS the length of the tenon on each end. And then there are the tenon's shoulders. Getting them right isn't quite as simple as they first appear. Blow the tenon length, or its thickness or width, or its shoulders and you've got a problem whose solution requires either modifying other matching parts - or making a whole new part.
Loose tenon mortise and tenoning significantly reduce or completely eliminates the "challenges" of true mortise and tenon joinery - no shoulders to deal with, no "plus the tenon length" thing. And you can make the loose tenon out of what would otherwise be scrap and tune the fit as tight or as loose as you want. AND, most of the time, if you make a mistake cutting a mortise, your can plug it and try again.
If you have a way of cutting mortises in end grain why not give loose tenon mortise and tenon joinery a try. I'm betting once you do that you'll seldom make true mortise and tenon joints again.
As pointed out earlier, the tricky part of this idea is that Cloud Lift integration thing - the bottom of the top to the top of apron. A lot of hand tool work would get me to a decent fit - but that would involve a lot of Take A Little Off, Test The Fit, Take Some More Off (repeat 10 to 100 times). I'm definitely not that patient. I like Mark Adams' approach to this type of problem - what power tools and tooling do I have, or can easily acquire, that'll do most, if not all, of the grunt / precision work?
I immediately think:
- Forstner Bit, Drill Press,
- Router, Router Table, Router Bits.
I know I can easily get a fortstner bit and a half round bit - all in the same radius. Question then became - what radius? That required a full scale drawing to figure out what would look right.
Back to SuperPaint, which conveniently can display dimensions - in decimal inches, or millimeters (a very handy program good old SuperPaint , old because the last version was done in 1993. Can you think of any software you began using 15 years ago, and it's still a workhorse for you today?)
After deciding on the basic proportions, the next question was where to place the cloud lift. Center it between the "legs", leave it completely arbitrary, or center one of the two curves? The location shown below was what I decided on - though I'm sure you have your own opinion. If you make your own version of something like this YOU get to decide where it should be. This is what I chose.
If you want the 1:1 full sized drawing - click here
Note: this whole thing is based on using common 3/4" stock for the top. As is often the case, if you happen to have, and use, a joiner and planer, that 3/4" thickness isn't cast in stone - a little thicker or a little thinner can be accomodated - but make life more complicated.
So - we'll be playing with
1 1/2" diameter forstner bit
3/4" radius roundover router bit
a router in a router table
AND
a fence that can be positioned properly AND in which you can cut the profile of the bit for Zero Clearance
Let's focus on The Tricky Part - where the top/lid joins the rest of the sconce/lamp - specifically at the front.
See the "challengeS"?
That's right - How do you make roundovers - in the middle of a board - on the underside of the top and the top of the apron?
ANSWER: Two boards. Round over one edge of each and glue them together. BUT - if you want to have the glued together results LOOK like it's one piece - you better cut both parts from the same board - and the grain of that board should lend itself to matching things up at glue up time. A quarter sawn, straight grain board simplifies things. Of course, that's NOT what I did. The idea of making the contrast between heartwood and sapwood a design element was just too hard to pass up. That meant joining TWO pieces of wood for the top - and getting the sapwood "blaze" centered on the width. Made things a bit more interesting.
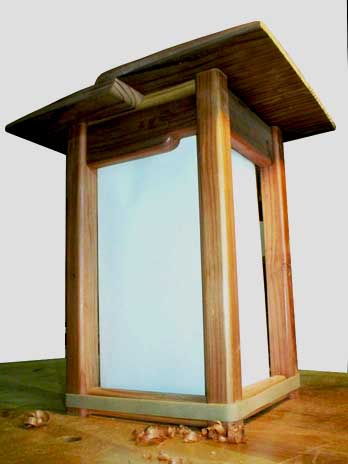
It was at this point that some practical issues became apparent. First there's HEAT. If a small, Christmas lights sized bulb is used this thing will glow - dimly - but not get hot. If a 60 watt incandescent or even a 20 watt compact fluorescent is used there'd be a heat built up - on the underside of the top. Wood, especially cross gain, doesn't like repeatedly cycling through 30 degree temperature changes, day after day. If a vent is cut iin the top to allow the heat to dissipate - light will stream out of where it shouldn't. If a gap is left between the underside of the top and the top of the apron you've got the same problem. I guess I could do some type of baffling in the side aprons
NOW it's time to make the parts . . . ---->